


What is a profile for 3D printing?
The 3D printing profile is a data pack composed of a complete list of print settings and parameters. It not only covers the basic settings related to 3D printing, such as layer, platform addition, speed, and support, but also contains more advanced settings such as filaments, printers, and extrusion control. The profile is used to control your printing procedure when converting models into G-Codes that the 3D printers can understand.
The usual format of the profile is the .bin format. ideaMaker has built-in profiles of different qualities for a variety of filaments. For example, ideaMaker provides „High quality“, „Standard“, and „Speed“ profiles for Raise3D E2 printer. These profile files have been repeatedly calibrated by test engineers to be effective. However, whether it’s someone new to 3D printing or a senior test engineer, optimizing parameters is a repetitive and troublesome process. In this process, users need to repeatedly modify those parameters and 3D print the G-Code file to verify it. This takes a lot of time and can be costly.
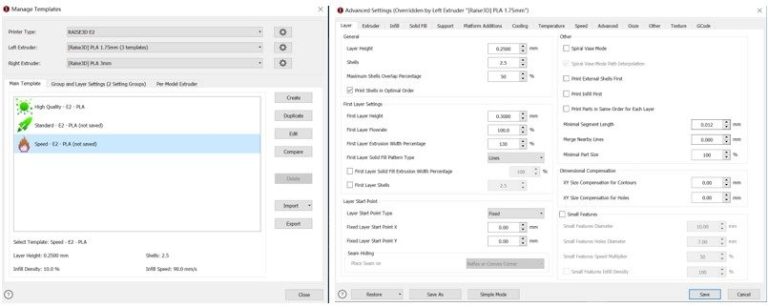
Figure 1 The slice template provided by ideaMaker.
What is Profile Iterator?
In order to simplify the calibration process and to improve the profile itself, Raise3D launched a systematic and visual test assistant – Profile Iterator.
Profile Iterator is really a multi-stage human-computer interaction system. The user will complete the interactive test with the Profile Iterator step-by-step, and then get the results. The figure below is its basic interaction logic.
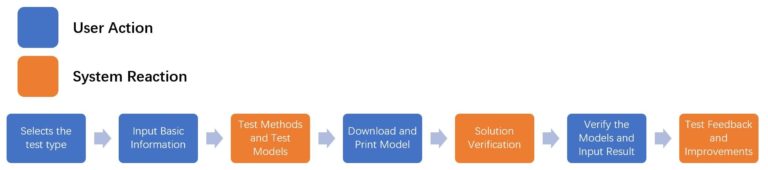
Figure 2 The Process of Multiple Human-computer Interactions between User and Profile Iterator.
Users only need to follow the prompts on the web page to complete the test process. Profile Iterator will provide users with potential causes of problems when printing. More importantly, Profile Iterator will help users to verify whether the current profile is the best one and calibrate it.
What types of tests does the Profile Iterator provide?
Profile Iterator currently provides two types of tests, with a total of 5 test options. Not every test needs to be completed, and you can choose a single test according to your needs. Of course, you will get a better profile if you complete all tests.
- Basic Calibration
Basic calibration includes Temperature Test and Flowrate Test. These two tests involve printing temperature and infill flow, which directly affect the overall integrity of the final model.
Profile Iterator aims to help you find the best printing temperature and flow rate for your filament. When you use a new printer or new filaments, it is recommended that you run Basic Calibration.
1) Temperature Test
In the Temperature Test, Profile Iterator will provide a temperature tower model to test the print quality of the model at different temperatures and help users find the best temperature.

2) Flowrate Test
Flowrate Test requires the printing a two-layer hollow cube using the profile the user wishes to verify and test the thickness of each side of the cube in order to measure the optimal flow rate percentage.

- Feature Tests
If you have completed the basic calibration, or want to improve the profile further, you can perform the Feature Tests. Profile Iterator provides four types of Feature Tests to address common problems with the model.
1) Vertical Surface Test
Users need to print the cube to calibrate the temperature and flow settings.
2) Ghosting Tests
Users need to print a custom 20x20mm cube to test for ghosting problems.
3) Start/End Points
Users need to print the block model to check the start/end printing results.
4) Top Surface Test
Users need to print the block model and analyze the printing effect of the top part.
How to use Profile Iterator
Step 1. Upload
Click „Upload“ to upload the .bin file and enter the Profile Iterator test page.

Step 2. Select Test
To start a test, click „Start“ under a test icon (Here takes “Temperature Test” as an example).

Step 3. Input Basic Information
Enter the printer information and what kind of filament you use, then click „Next“. You need to enter accurate printer and filament information.

Step 4. Test Model and Test Methods
Profile Iterator will provide the specific test methods. You need to print a temperature tower model which has 5 parts, ranging from A to E. Each part is printed at a different temperature in the same interval (for example, the printing temperature of part A is 195°C, and the temperature of part B to E is increased by 5°C). Profile Iterator will automatically generate the temperature interval and fill in other parameters (such as infill density, build plate temperature, etc.), and you can also manually set the temperature range. After the setting is complete, click “Next”.

Step 5. Download and Print
Profile Iterator will generate a test G-Code file based on the data you filled in the previous step. You need to download the file and print the model on your 3D printer.

Step 6. Validate Test Result
When your model is successfully printed, return to the Profile Iterator and click „Validate Test Result“ to start verifying your model. Profile Iterator provides a specific verification scheme. For example, the Profile Iterator here requires you to check the overall condition of the printer and the model. If the printer is noisy when printing, or the model skips layers or has tiny air bubbles, there may be problems with your printer and its filaments. You can find a specific solution by following the prompts in the picture.
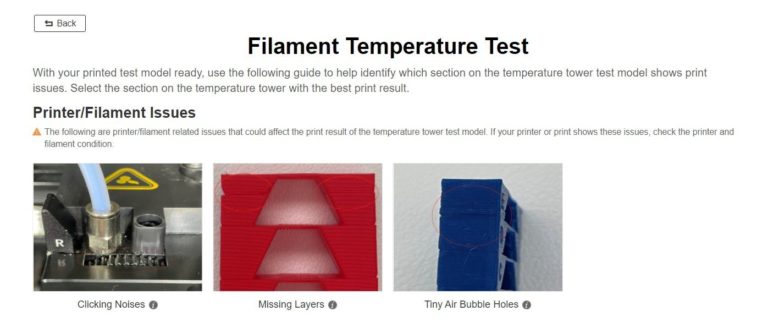
Figure 3 Issues you may meet when printing, such as clicking noises, missing layers, air bubble holes.
Next, we will further verify how temperature influences the final model. Profile Iterator provides four types of indications of problems caused by using improper temperature, such as stringing, drooping bridges and overhangs, etc. Check which part (A to E) of the temperature tower model has the best print quality, and which part has the problem.
Just like when answering multiple-choice mathematical questions, you only need to answer the questions provided by Profile Iterator based on what you see. For example, the Profile Iterator here asks you to “Please select the section on the test model with the best result.” You can choose the correct answer according to what you observe on the printed model.
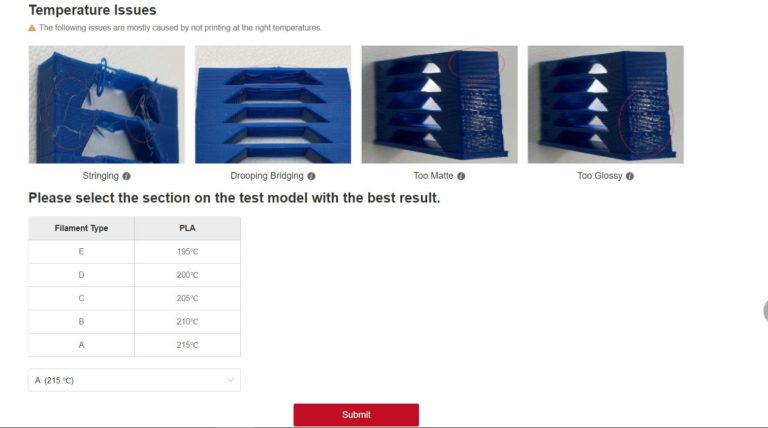
Figure 4 Issues with temperature, such as stringing, drooping bridging, too matte and too glossy.
Step 7. Acquire Validate Result
At this point, you are about to get your final answer. If you think that the printing temperature of Part A is 215°C is the best printing temperature, select the answer and submit the test. Profile Iterator will confirm that 215℃ is the best printing temperature for your profile and update it. You can download the updated profile and use it directly in the slicing software!

If the test result you enter is far from the standard result of Profile Iterator, Profile Iterator will ask you to reset the profile parameters and test again (below is the Flowrate Test as an example).

On completing the test, you have obtained an iterative profile file. You can perform other tests or start a new print.

Application of Profile Iterator
Profile Iterator provides users with an automatic profile file that allows them to verify their printing profiles on their own. With Profile Iterator, whether you are a 3D printing novice or a test engineer, you can quickly find the cause of problems with the print model, and better optimize the profile file.
Profile Iterator can also be linked with the slicing software, ideaMaker, and the powerful database ideaMaker Library, in order to obtain online high-quality profiles of various models shared by users around the world. Users can download these files and use Profile Iterator to ensure the profile files that meet their needs. ideaMaker Library has also launched a profile generator and comparison software. Users can generate profile files online or compare them.
In the future, Profile Iterator can be used in calibration, iteration, and mass production processes to further enhance industrial production and individual users. It will help them use new printers and filaments, as well as aid them to complete batch profile verification.