Let’s face it, traditional mold making is slow and expensive. You could spend $10,000 to $50,000 just to get started with a metal mold, and then wait 5 to 7 weeks (or longer) before you even mold a single part. But now, 3D printed injection molds are changing the game for good.
If you’re producing between 10 and 100 plastic parts, or even short runs up to 1,000 units, 3D printing can cut your tooling costs by up to 90% and deliver a working mold in 1–2 days, with parts ready to mold in under a week.
That’s a massive shift from how injection molding used to work, and it opens the door to faster design iterations, lower risk, and more flexibility.
The sweet spot? Small molded parts under 150 mm and 165 cm³, especially when you’re testing prototypes or refining complex designs.
These printed molds can hold up for 30 to 100 injection cycles, and you can always batch-produce identical inserts to reach higher volumes. Some reinforced composite molds have even exceeded 1,500 shots in controlled conditions.
Of course, injection molding requires materials that can handle heat and pressure. That’s why resins with heat deflection temperatures above 150°C, high compressive strength, and excellent dimensional accuracy are critical.
Raise3D’s DF2 DLP printer, when paired with BASF’s Ultracur3D® RG 3280, delivers that performance, with ±0.1 mm tolerances and a smooth, durable surface finish that meets the demands of small-batch manufacturing.
In this article, we’ll walk you through the design considerations involved in creating and using 3D printed molds for injection molding, from material selection to printer setup, post-processing, and when to choose them over traditional steel or aluminum tooling.
Can You 3D Print Molds for Injection Molding?
Yes, you can 3D print molds for injection molding, and not just for prototyping, but for actual production of plastic parts.
When designed correctly, 3D printed injection mold tools can withstand the pressures and temperatures of the injection molding process and deliver between 10 and over 1,000 molding cycles.
In some controlled cases, 3D printed molds, especially those produced with high-performance metal additive manufacturing, have reached more than 3,000 shots.
These results depend heavily on part geometry, injection pressure, mold material, and cooling system efficiency.
Polymer-based printed molds are suitable when using plastics like PP, PE, TPU, and TPE, especially when the resin has a high heat deflection temperature.
Commercial materials with HDT values between 218°C and 289°C and tensile moduli up to 10 GPa are commonly used to meet these requirements. These properties allow the molds to withstand molten material flow without deformation and maintain dimensional accuracy over repeated cycles.
Whether you’re using photopolymers or metal tools, additive manufacturing presents a cost-effective alternative to aluminum tooling or steel molds, especially in low run injection molding projects where rapid delivery and flexibility matter most. You just need to match the mold design and material selection to the specific requirements of your injection molding machine, plastic resin, and intended production volume.
Why Use 3D Printing for Injection Mold Making?
Speed, cost efficiency, and design flexibility are the top reasons why you should consider 3D printing for mold making. Whether you’re working on pilot runs, iterative prototyping, or specialized components, additive manufacturing enables rapid creation of molds without waiting weeks or paying high machining costs.
Once you validate your CAD model, you can produce and test a printed mold within a couple of days, avoiding time-consuming back-and-forth with external mold shops. Here’s how 3D printing enhances the mold making process:
- Faster Production: You can reduce mold lead time by up to 70%. This allows you to begin testing or production much sooner than waiting for CNC-machined aluminum molds or traditional steel tooling.
- Lower Cost: Printed molds cut tooling costs by 80–90%. A short-run tool that might cost $1,600 in aluminum can be printed for under $100, including labor and materials.
- Design Flexibility: Complex features, custom cooling channels, and integrated gates can be added with fewer constraints than metal tooling. Design changes are cheaper and faster to implement.
- Rapid Iteration: You can test multiple mold cavity versions in a single print run, making same-day design revisions realistic.
- Low Capital Requirements: You can run 3D printed molds on small benchtop or desktop injection molding machines, which lowers your upfront equipment investment.
- Better Cooling Efficiency (in Metal AM): Additively manufactured metal tools with conformal cooling channels reduce cycle time by 30–70%, improving throughput for molded parts.
Below is a practical comparison of common mold types:
| Factor | Conventional Metal Molds | 3D Printed Plastic Molds | 3D Printed Metal Molds |
| Tooling Cost | $10,000 – $100,000 | $50 – $500 | $1,000 – $10,000 |
| Lead Time | 5–12 weeks | 1–2 days | 4–7 days |
| Cooling Time | Standard | Longer | 30–70% shorter |
| Durability | 100,000+ cycles | 30–100 cycles | 1,000–100,000 cycles |
| Flexibility for Revisions | Low | High | Moderate |
| Abrasion Resistance | High | Low to Moderate | High |
| Surface Finish | Excellent (after polish) | Good (with post-process) | Excellent |
What are the Common Applications of 3D Printing Molds in Injection Molding?
Short run injection molding, prototype production, and insert molding are among the most common applications where 3D printed molds prove especially valuable.
These use cases share a need for fast turnaround, low cost, and flexible mold design, factors where traditional molds often fall short.
By using a 3D printed injection mold, you can skip many of the delays and setup costs typically involved in CNC machining or aluminum tooling..
Short Run Injection Molding
3D printing is exceptionally well suited for creating molds used in short run injection molding. If you’re producing fewer than 1,000 units, especially across multiple versions or product variants, additive tooling offers the best solution in terms of cost and lead time.
Polymer-based mold inserts can reliably produce between 30 and 100 molded parts per cavity. This range depends on factors such as melt temperature, clamp pressure, material choice, and part geometry.
When higher quantities are needed, you can print multiple identical mold inserts in parallel to distribute the load and extend production output.
The economics also work in your favor. With a breakeven point below 1,000 units, you avoid the high upfront tooling costs of metal molds. Instead of spending thousands on aluminum molds, you may pay just a few hundred dollars for materials and machine time—plus labor. That translates into major savings for startups, R&D teams, and low-volume production.
You can further improve mold durability and output by applying release spray and minimizing clamp force during the injection process. These simple steps extend the usable life of each printed mold without re-machining or additional equipment.
Printed molds are especially effective when molding plastic parts under 150 mm and ≤165 cm³ in volume.
What are the Resin Requirements for Short-Run Injection Molding?
To get the best results from your 3D printed mold, you need to use resins that meet the mechanical and thermal demands of injection molding. These resins must handle high temperatures, mechanical stresses, and repeated mold cycles without deforming, cracking, or losing dimensional accuracy.
Here are the essential requirements:
- High Heat Resistance (≥150°C / 300°F): Your mold must withstand high melt temperatures without softening. Resins like Formlabs High Temp Resin or Ultracur3D® RG 3280 exceed this threshold, offering performance up to 230–289°C.
- High Compressive & Tensile Strength: Injection molding requires the mold to endure clamping forces and injection pressures. Glass-filled photopolymers with a tensile modulus around 10 GPa are ideal for resisting crush under 80-ton presses.
- Dimensional Stability & Low Shrinkage: To maintain the exact geometry of your mold cavity, you need resins that offer minimal deformation during cooling and repeated heating cycles.
- Wear & Abrasion Resistance: Each injection exposes the mold to friction and stress. Resins with high stiffness and surface hardness prevent early wear and reduce the need for frequent replacement.
- Good Surface Finish: A smoother mold surface leads to cleaner molded parts and reduces your post-processing workload.
Low-Volume and Prototype Production
3D printing is especially effective for low-volume production and prototype mold making. If you’re working on pilot runs, MVPs (minimum viable products), or design validation, the advantages are immediate, faster lead time, lower tooling costs, and easier design changes.
When you’re launching a new plastic component, committing to aluminum molds or steel molds too early can be risky and expensive.
Instead, using a 3D printed mold allows you to validate part geometry, injection performance, and end-use function before scaling up to mass production. This gives you the flexibility to make revisions without wasting time or money on tooling changes.
Additive manufacturing helps you produce functional molded parts within days, not weeks. Once your CAD model is finalized, you can print a mold, mount it in a benchtop injection molding machine, and test your first parts, all without involving traditional mold shops. That’s a massive advantage when time to market matters.
These printed molds are well-suited for the injection molding process using standard materials like ABS, PP, PE, and TPU.
As long as you’re within the dimensional constraints (e.g., cavity volume ≤ 165 cm³), you’ll get reliable molded parts with good surface finish and structural integrity.
Thermoforming and Vacuum Forming with 3D Molds
3D printing isn’t limited to injection molding, it’s increasingly used for making molds in thermoforming and vacuum forming applications. These processes, which shape heated plastic sheets over a mold cavity, benefit from the same strengths that additive manufacturing brings to other tooling methods.
When you’re forming thin-gauge sheets, a printed mold can serve as a low-cost master. It doesn’t require the thermal conductivity of aluminum tooling, and it holds up well under moderate temperatures and vacuum pressure.
This makes it ideal for prototyping packaging, trays, medical devices, or architectural models where surface quality and dimensional accuracy are key.
With proper mold design, including draft angles, vent holes, and smooth contours, you can achieve a vacuum-formed part that closely matches your intended geometry. High stiffness and heat-resistant photopolymers like those used in DF2 or Formlabs High Temp Resin support repeatable use, even for forming complex parts.
You’ll also appreciate the speed. Compared to time-consuming CNC machining or casting methods, you can go from CAD to testable thermoform mold in 1–2 days. That lets you iterate rapidly and meet tight project deadlines.
Overmolding and Insert Molding Applications
Overmolding and insert molding are widely used across industries such as automotive, electronics, consumer products, and healthcare. In these hybrid processes, a second plastic or elastomer is molded over or around a base component. 3D printed molds are well-suited for creating the first or second stage of this tooling, especially when production runs are small or the designs are still being finalized.
With insert molding, you’re embedding a pre-made component, like a metal thread, electrical connector, or sensor, inside a mold cavity and injecting plastic around it.
The mold must maintain tight tolerances and handle high injection pressures, making dimensional accuracy and thermal stability essential. This is where high-performance resins with high heat deflection temperature and compressive strength prove their value.
For overmolding, where you’re layering one material over another, mold surface finish and adhesion are critical. Printed molds with excellent surface quality reduce the need for post-processing and help ensure consistent bonding between layers.
You can print complex mold inserts with undercuts, locating features, or snap-fit geometries that would be costly or time-consuming to machine. If you’re building jigs or fixtures for supporting inserts during the molding process, additive manufacturing offers unmatched speed and customization.
What are the Different 3D Printing Processes Suitable for Mold Making?
- DLP (Digital Light Processing) stands out as the best solution for creating high-precision plastic molds. It provides finer surface resolution and faster curing speeds than SLA, and it’s especially suitable for engineering resins with high heat deflection temperature.
- DLP enables you to produce detailed, durable 3D printed molds with excellent surface finish, making it a leading option for low run injection molding and rapid tooling applications.
- SLA (Stereolithography) also produces high-quality printed molds, with layer heights of 25–50 µm and surface roughness below 1 µm after curing. It’s ideal for small parts or applications needing fine textures.
- However, SLA machines often come with slower speeds and limited throughput compared to optimized DLP systems.
- FDM (Fused Deposition Modeling) is the lowest-cost method but produces parts with visible layers and anisotropic mechanical properties. This means additional steps like sanding, chemical smoothing, or coatings are needed to achieve suitable mold surface quality. FDM molds typically have shorter lifespans and are limited to low-pressure molding or thermoforming applications.
- SLS (Selective Laser Sintering) is less commonly used for mold making because the porous, grainy surface finish isn’t ideal for direct injection molding. However, it’s often used for jigs, fixtures, or mold housings due to its strength.
- DMLS (Direct Metal Laser Sintering) and SLM (Selective Laser Melting) are preferred for metal molds. These powder-bed fusion processes produce steel molds with integrated cooling channels and excellent thermal conductivity. You can position cooling channels as close as 2 mm from the mold cavity, reducing cycle time by up to 70%. Though expensive, DMLS is the most suitable option when injection molding requires long production runs or extreme pressures. For polymer-based 3d printed injection molds, it’s generally recommended to keep the molded part volume below 165 cm³. Metal AM tools, however, remove this limitation and support larger, more complex geometries.
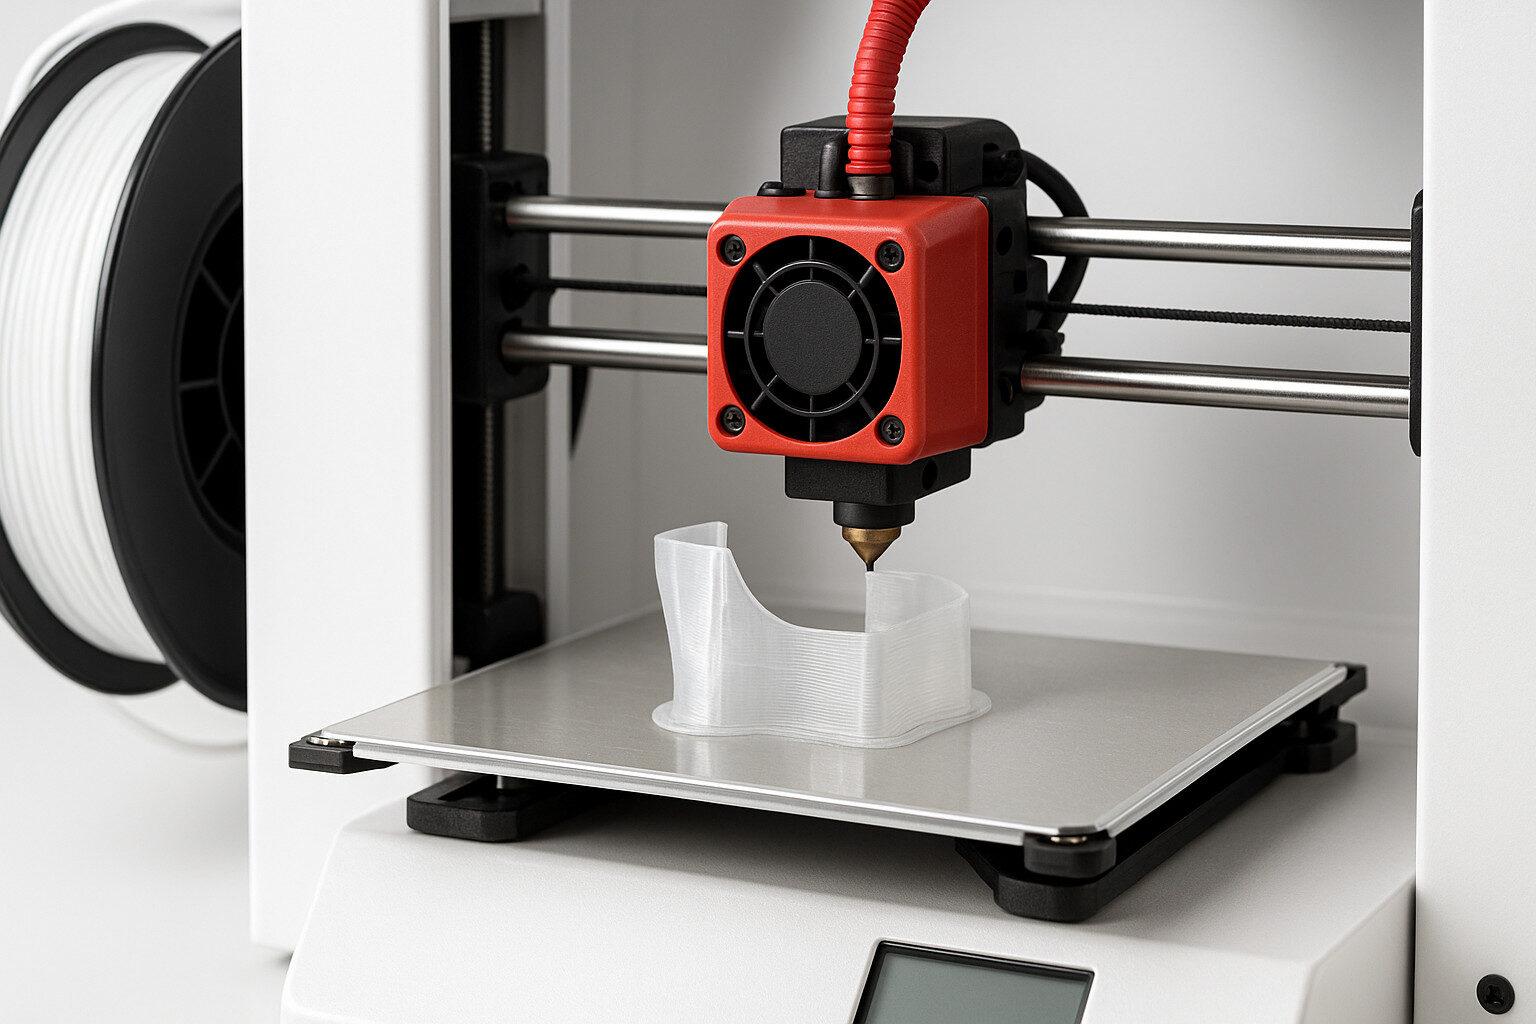
Raise3D DLP DF2 3D Printer
The Raise3D DF2 is engineered specifically for high-performance resin printing, and it brings measurable advantages to mold making for injection molding applications. With a combination of industrial-grade components and software-driven workflow automation, it allows you to produce reliable molds faster and with greater dimensional accuracy than most standard DLP systems.
This DLP 3D printer supports a full range of high stiffness engineering resins, including BASF Ultracur3D® RG 3280 and Formlabs High Temp Resin, both of which offer high heat deflection temperature, excellent surface finish, and strong wear resistance.
These materials are critical for printed molds that will be exposed to molten material and repeated injection cycles.
The DF2 includes a 1440p light engine and contour compensation, enabling consistent print tolerances down to ±0.1 mm, even for complex geometries like undercuts or flex arms. This helps maintain dimensional accuracy in the mold cavity and avoids post-processing corrections.
Five key features of the Raise3D DF2 that support mold making:
- Air-Peel Separation & Heavy-Duty Z-Axis: This mechanism allows large or heavy mold inserts (up to 10 kg) to print successfully without deformation or print failure.
- Integrated RFID Workflow: From print to wash and cure, the DF2 system uses RFID tracking to eliminate mix-ups and enforce traceable, repeatable parameters—ideal for regulated industries.
- Fast Iteration Cycle: Compared to outsourcing CNC machining or aluminum molds, DF2 enables same-day mold production. You can go from CAD to injection-ready mold in 1–2 days, reducing project lead time by up to 70%.
- Precision Layering: With layer heights adjustable between 50 and 200 microns, the DF2 gives you control over mold wall thickness, surface quality, and resin usage. This is crucial when optimizing for both durability and production efficiency.
- Software Optimization: The Raise3D ideaMaker slicer includes semi-automated supports and parameter profiles tuned for mold geometry, reducing print errors and labor time.
What are the Type of Materials Used for 3D Printed Molds?
Most applications use high-performance thermoset or photopolymer resins that combine mechanical strength, high heat deflection temperature, and dimensional accuracy—three key properties required to mold plastic parts under pressure and temperature.
Among the most commonly used materials:
- Stratasys Digital ABS is known for its toughness and thermal resistance. It’s used to produce plastic mold masters and short-run injection molds where moderate heat and stress levels are expected.
- Formlabs High Temp Resin offers HDT up to 238°C (460°F), making it suitable for low-volume injection molding of polypropylene and similar thermoplastics. It supports high-temperature molds with reliable surface finish and minimal distortion.
- Accura Bluestone by 3D Systems is a stiff, high-temperature resin suited for casting molds and mold masters. With low shrinkage and high stiffness, it’s ideal for parts needing dimensional precision.
- Carbon EPX 82 is a resin designed for tooling applications. While not commonly used in direct mold making, it is useful for fixtures and jigs that support molded part production.
- HP PA12 and PA11 GF (glass-filled) are powder-based nylons generally used in vacuum forming and thermoforming. Though not injection-grade, they serve well in mold housings or prototypes that require thermal and impact resistance.
One standout alternative for injection mold making is Ultracur3D® RG 3280 by Forward AM. When paired with the Raise3D DF2 printer, this material delivers excellent mold cavity performance:
- High Heat Resistance (~230°C / 446°F): Helps the mold withstand molten material injection without degrading.
- Excellent Dimensional Stability: Maintains shape over multiple cycles with low shrinkage.
- Superior Surface Finish: Offers smoother results compared to FDM or MJF processes, reducing post-processing.
- Mechanical Strength: With a tensile modulus near 10 GPa, it’s suitable for mold inserts exposed to high injection pressures.
- Cost-Effective: Performs close to metal molds but at a fraction of the cost, especially for short runs or prototyping.
Here’s a comparative overview of commonly used mold materials:
| Resin | High Heat Resistance (°C/°F) | Excellent Dimensional Stability | Surface Finish Quality | Mechanical Strength | Cost-Effectiveness |
| HP PA12 | 175°C / 347°F | Yes | Good | Moderate to High | High |
| PA11 GF | 190°C / 374°F | Yes (Glass Filled) | Moderate | High | Moderate |
| Stratasys Digital ABS | 82–90°C / 180–194°F | Yes | Excellent | High | Moderate |
| Stratasys ULTEM 1010 | 216°C / 420°F | Yes | Good | Very High | Low |
| Accura Bluestone | 130°C / 266°F | Yes | High | High | Moderate |
| HiTemp (3D Systems) | >300°C / >572°F | Yes | High | Moderate to High | Low |
| Carbon RPU 70 | 65°C / 149°F | Moderate | Moderate | High | Moderate |
| Carbon EPX 82 | 130°C / 266°F | Yes | Good | Very High | Moderate |
| Formlabs High Temp | 238°C / 460°F | Yes | High | Moderate | Moderate |
| Ultracur3D® RG 3280 | >280°C / >536°F | Yes | Smooth, Ceramic-like | Very High (10 GPa modulus) | Moderate |
What Is the Process to Design, Create and Use a 3D Printed Mold?
The process of creating a 3D printed injection mold follows a sequence of well-defined steps: CAD design, file export, 3D printing, mold assembly, injection, and post-processing.
Each stage requires careful planning to ensure the mold cavity can withstand high temperatures, clamping pressure, and repeated cycles during the injection molding process.
You start by designing the mold in CAD software, integrating cooling systems, draft angles, and tolerances. Once modeled, you export the design for slicing and 3D printing using a resin suited for tooling, typically one with high heat deflection temperature and high stiffness.
After printing, the mold may need cleaning, curing, and light post-processing before it’s ready to mount inside an injection molding machine.
Printed molds are then clamped into benchtop or industrial machines, where molten material is injected to form plastic parts. If your mold design follows best practices, including reinforced walls and tight tolerances, the mold will consistently produce parts with minimal flash and dimensional variation.
CAD Design and Mold Modeling
Every detail,from wall thickness to parting lines, affects how well your mold performs in real-world production. You can use design software like SolidWorks, Fusion 360, or Siemens NX to model the core and cavity, plan gate locations, and simulate the injection process digitally before printing.
When working on 3D printed mold designs, you should optimize for both structural strength and ease of post-processing. This includes avoiding under-supported walls and ensuring even distribution of molten material during injection. Mold inserts should include alignment features and venting channels to control pressure buildup.
Here are several best practices to improve mold quality and lifespan:
- Orient mold cavities away from support structures to reduce post-processing and surface blemishes.
- Include vent slots approximately 0.05 mm deep to allow air to escape during injection.
- Design with at least 2° of draft angle to ease part ejection and avoid sticking.
- Use centering pins or alignment features to ensure proper mold closure under pressure.
- Add extra stock (≈ 0.125 mm) to mold backsides if the insert will be compressed in a frame or clamped directly.
Export the CAD File
Once your mold design is complete, export the CAD model in STL or 3MF format for slicing. Make sure your file preserves all fine details, especially around the mold cavity, ejector pin locations, and gate geometry. These features are crucial for producing plastic parts that meet your design specifications.
Most 3D printers used for mold making, including DLP machines like the Raise3D DF2, require clean, watertight meshes. Double-check for non-manifold edges and inverted normals to avoid print errors. Once validated, import the file into your slicing software, adjust orientation, and apply print-specific settings to prepare for the manufacturing process.
Printing the Mold
Once your CAD model is finalized and exported, it’s time to move to the printing stage. This step determines the dimensional accuracy, surface finish, and structural integrity of the 3D printed mold. The printer setup should prioritize resolution and orientation to minimize supports on the mold cavity and optimize resin usage.
Use layer heights of ≤ 50 µm to ensure a smooth mold surface that reduces drag during part ejection. A finer Z-resolution also minimizes the need for sanding or sealing. Resin-based printers, particularly DLP systems like the Raise3D DF2, provide the excellent surface finish and high heat deflection temperature required to handle molten material inside the mold cavity.
Orientation matters. Always position flat surfaces parallel to the build plate and ensure even distribution of stress across the mold during curing. You can reduce material waste and maximize throughput by nesting multiple identical mold inserts in a single print job. This is particularly useful when preparing for low run injection molding batches or testing multiple mold variants.
Mold Assembly and Preparation
After printing, assembling and preparing the mold is essential to ensure it fits securely and performs consistently during injection. Multi-part molds should align precisely, form a clean split plane, and allow for venting and ejector pin access if required. Poorly assembled or unsupported molds often warp, leading to flash or short shots in molded parts.
Fitting the mold into a metal frame, a technique known as insert-in-frame, is one of the best ways to maintain dimensional accuracy and reduce warpage. This setup provides structural reinforcement, evenly distributes clamping force, and keeps the mold cavity stable during injection pressure cycles.
For stand-alone printed molds, you’ll need to design thicker walls or integrate reinforcing ribs to prevent deflection. Make sure to include a 0.125 mm stock allowance on the back face so that the insert can be fully compressed within a vise or frame. This minimizes the chance of parting-line flash and improves cycle consistency.
Before mounting the mold in the injection molding machine, apply a release agent to critical areas. This helps reduce ejection force, extend mold lifespan, and protect against material adhesion. Also, inspect for clean venting channels, around 0.05 mm deep, to allow air to escape during the injection process and prevent trapped bubbles or burn marks on plastic parts.
Injection Molding with 3D Printed Molds
Using a 3D printed mold inside an injection molding machine follows similar steps as traditional tooling, but with a few important adjustments. You start by securely mounting the mold insert into the machine’s platen or a benchtop mold fixture. Clamp pressure should be optimized for printed molds, often lower than what aluminum tooling or steel molds require.
If you’re working in a lab environment, benchtop hydraulic or pneumatic presses (<10 tons) are affordable and fully capable of handling low-volume jobs. For scaled-up pilot runs, desktop injection machines can mold dozens to hundreds of parts from the same mold, depending on the resin’s durability and thermal behavior.
Inject the molten material at a slightly reduced pressure to prevent damage to the printed mold cavity. Slowing the injection rate or enlarging the gate also helps preserve mold integrity while ensuring full cavity fill. This is especially important for high-viscosity or glass-filled materials, which place additional stress on the mold walls.
After each cycle, allow sufficient cooling time. Unlike metal molds with integrated cooling systems, printed molds typically dissipate heat slower. You can mitigate this by pausing briefly between cycles or using external air-cooling methods. With proper mold design and machine setup, a single 3D printed injection mold can deliver 30 to 100+ cycles of high-quality plastic parts, making it an efficient and cost-effective solution for prototyping, pilot production, and complex low-run tooling applications.
What Post-Processing Can Be Done on 3D Printed Molds?
Start by sanding or polishing the mold cavity. This reduces friction during ejection and helps avoid tearing or stress on molded parts. You’ll also improve dimensional accuracy in high-tolerance zones and eliminate surface micro-defects that could transfer to the injected material. This is especially helpful when producing prototypes for consumer-facing products or functional components.
Sealing is another important step. Applying a ceramic or epoxy coating enhances thermal stability and creates a non-stick surface for molten material. These coatings also protect your mold from repeated heating cycles, a critical consideration if you’re using it for low run injection molding.
If you’re working with printed molds created from Formlabs High Temp Resin or Ultracur3D® RG 3280, minimal smoothing may be required. Both offer excellent surface finish and high heat deflection temperature, reducing the need for extensive reinforcement. Still, it’s wise to inspect the parting line and ejector pin holes to ensure flash is controlled and there are no burrs or obstructions in the mold cavity.
What are the Common Challenges When 3D Printing Molds in Injection Molding and How to Overcome Them?
Warping is one of the most common issues. It typically occurs during the cooling phase or due to asymmetric wall thickness. To counteract this, use an aluminum frame to constrain movement, and design cooling systems or wall structures that distribute heat evenly.
Flash happens when the mold halves don’t align perfectly or when material seeps into the mold seam. You can prevent this by polishing the split-plane, adding alignment pins, and ensuring higher clamp force on the injection molding machine. A 0.125 mm stock allowance on the mold back also improves compression during clamping.
Delamination, layer separation within the mold can result from poor printer calibration or inadequate curing. Using printers like the Raise3D DF2 with controlled wash/cure processes significantly reduces this risk, especially for high-temperature applications.
Dimensional accuracy varies depending on resin and layer resolution. Always run a test mold and offset critical dimensions in your CAD model to compensate for resin shrinkage or printer-specific tolerances.
Cooling issues are another limitation in printed molds compared to traditional metal molds with integrated channels. While you can’t achieve the same thermal conductivity, you can use external air cooling between cycles to prevent mold degradation.
What are the Different Types of 3D Printed Molds for Injection Molding?
There are several types of 3D printed molds suited for various tooling applications. Choosing the right one depends on your project scale, material compatibility, and thermal or mechanical stress expected during injection molding.
- Insert-in-aluminum-frame molds are the most common method for improving structural support. The printed mold is clamped into a CNC-machined aluminum base to maintain alignment, prevent warpage, and extend mold life.
- Stand-alone polymer blocks are useful when you want to avoid secondary machining. These printed molds include integrated gates, runners, and cooling features but typically require thicker walls to withstand pressure.
- Sacrificial dissolvable molds are printed from water- or alkaline-soluble materials. They allow for complex internal geometries or undercuts and are typically used for overmolding or casting. These molds dissolve within 12–48 hours in solution, leaving behind the desired part.
- Metal additive molds created through DMLS or SLM processes offer the durability of traditional steel molds with conformal cooling channels. These are used for high-volume injection molding where thermal control is essential.
Can You Use 3D Printed Molds for All Types of Injection Molding?
No, 3D printed molds can support many types of injection moulding applications, but not all. While they perform well for low-volume production, prototyping, and cost-sensitive runs, they aren’t ideal for every scenario. Specifically, these molds are not suitable for high-pressure or high-temperature processes such as gas-assisted injection molding or molding high-performance polymers like PEEK.
The limitation lies in the thermal and mechanical tolerance of the materials used to create the mold. Resin-based molds and even reinforced composites can degrade when exposed to sustained high injection pressures or temperatures above typical resin thresholds. For those cases, metal additive tooling offers a viable alternative, maintaining dimensional integrity while withstanding extreme molding environments.
For most conventional applications, such as polypropylene, polyethylene, ABS, and other engineering-grade thermoplastics, 3D printed molds offer a practical and cost-effective option. When paired with high-performance materials like heat-resistant photopolymers, these molds can deliver consistent results across tens to hundreds of cycles. With proper mold design, alignment, and controlled processing parameters, you can extend mold life and minimize production issues.
Do 3D Printed Molds Have Any Limitations?
Yes, and one of the primary drawbacks is their thermal performance. Compared to other materials like traditional aluminum molds or steel tools, 3D printed mold materials have lower thermal conductivity. This leads to slower cooling times, which can extend the injection cycle from seconds to several minutes depending on the part geometry and resin used.
Additionally, molds made from photopolymer resins or composite materials degrade more quickly under high temperatures—especially when melt temperatures exceed 250°C or when using abrasive, glass-filled plastics. These conditions can result in warping, dimensional distortion, or early surface fatigue, which compromises the quality of molded parts.
Volume is also a constraint. For applications involving large parts or requiring extremely high pressure, metal molds or CNC machining may still be the better choice. You should evaluate each project’s requirements carefully to determine if a 3D printed injection mold is the right fit.
How Much Does a 3D Printed Mold Cost?
A small insert made with high-performance resin typically ranges from $70 to $500, depending on complexity, layer resolution, and support structure. The material itself, such as a high heat deflection temperature resin, can cost between $150 and $170 per liter.
You also need to consider machine time, post-processing labor, and potential iteration cycles, which can add to overall cost but still remain significantly lower than traditional methods. For comparison, a 25-part project using a 3D printed mold saved approximately $1,600 versus producing an equivalent aluminum mold.
What is the Lifespan and Durability of 3D Printed Molds?
Polymer-based molds generally last between 30 and 100 cycles, making them ideal for low-volume production or pilot runs. Reinforced composites, particularly those with high stiffness and excellent surface finish, can last longer, some documented cases show molds reaching over 1,500 cycles with proper support and cooling strategies.
If you’re using metal additive manufacturing for mold creation, the lifespan increases dramatically. These tools can handle more than 100,000 shots when designed with stress relief and conformal cooling in mind. They’re often used as permanent replacements for conventional steel molds in specialized applications.
To maximize the service life of your printed mold, it’s essential to manage injection pressure, temperature exposure, and ejection force. You can also extend usability through post-processing steps like sealing, polishing, and fitting the mold in a metal frame to reduce warping and maintain dimensional accuracy.
When to Use 3D Printed Molds vs. Traditional Molding Techniques in Injection Molding
If you’re deciding between 3D printed molds and traditional molding methods, your best option depends on production volume, part geometry, and how fast you need to go from idea to part. For low run injection molding, typically up to 1,000 parts, polymer molds offer unmatched speed and design flexibility at a fraction of the tooling cost. These printed molds can be created and tested in days, compared to the weeks or months required for aluminum molds or steel molds made via cnc machining.
You should consider additive manufacturing when rapid iteration is a priority or when the injection molding process demands intricate mold cavity features. Lead time and manufacturing costs drop sharply, especially during early-stage product development.
However, once your volumes exceed 1,000 pieces, aluminum tooling becomes more cost effective. For mid-range batches (1,000–10,000 parts), metal additive inserts offer a solid bridge before you commit to hard steel molds for full mass production.
Conclusion
At the end of the day, using 3D printed molds isn’t just a cool trick, it’s the real deal for how we design and make plastic parts. Whether you’re building a prototype, testing a new idea, or running a short production batch, 3D printing helps you move faster, spend less, and make changes without stress.
We’ve all been there, stuck waiting on expensive aluminum molds or having to commit to a big order before you’re ready. With printed molds, you skip the long lead times and high upfront tooling costs. You can test parts quickly, tweak designs overnight, and only scale up when you’re sure it works.
3D printed molds aren’t perfect for everything, but when used right, they give you a smart, flexible option that keeps your production lean, your budget in check, and your team ahead of schedule.