


PVA filament is a 3D printing material mainly used for support structures for models printed in other filament. Common PVA can only be printed well with PLA. Higher grade product like PVA+ from Raise3D is compatible with many more popular materials such as PETG, PA (nylon) and PA12 CF. PVA is water-soluble, meaning it dissolves in water. This characteristic makes it a popular 3D printing material for support structures because it can be easily removed, especially for models whose designs make it difficult or impossible to remove the support structure by hand.
However, when printing with PVA filament, it is important to remember that it’s a material that absorbs moisture easily. If it is not processed properly, there is a chance the printing will fail.
PVA is not the only type of 3D printing material that can be removed by dissolving. Other filaments that can be dissolved include BVOH and HiPS from BASF, but these 3D printing materials usually suffer from a lower printing success rate. Also, these materials have a printing time that is 2-3 times longer than usual. Therefore, users need to do what they can to lower the risk of printing failure.

In this guide, we will introduce the basic settings in ideaMaker for specialized support filaments such as PVA, BVOH, and HiPS. These specialized support filaments can be effective for 3D printers from Raise3D as well as printers from other brands*.
*Disclaimer: When reading through this guide, keep in mind that while Polysupport is another kind of specialized support filament, it is not dissolvable. Therefore, the slicing settings in this guide do not apply to it.
Support Settings
Support settings for PVA are different from conventional filaments, because PVA supports dissolve and can be removed.

When applying PVA supports, the most commonly used settings are marked by red boxes shown in the above picture.
Infill Pattern
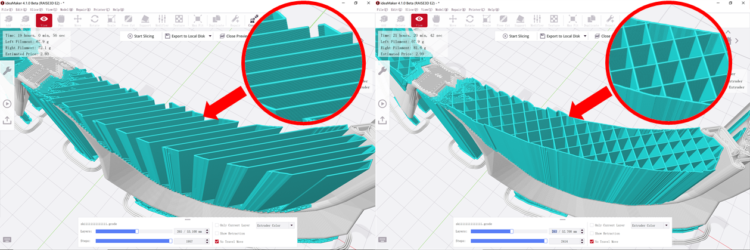
(Left: Lines, Right: Grid)
You can choose the pattern of the support structure. These patterns have a default setting of Lines. However, while it is easy to break them by hand, supports using this pattern are also less stable and it is easier for them to deform and collapse.
Since PVA filament can be dissolved, there is no requirement for manually removing the resulting supports. Therefore, an advantage of PVA is that users have the option to choose more stable patterns, such as the Grid and Triangles, which otherwise would be less desirable options for supports that need to be removed by hand.
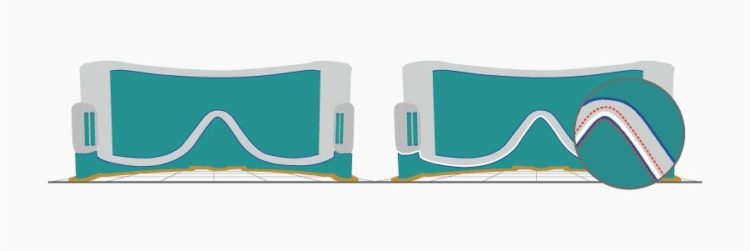
Horizontal Offset

(Left: 0.2mm, Right: 1.0 mm)
Users can set the distance of the gap between the support and the object. By reducing the distance, the support structure will stick more tightly to the overhang surface. This helps to prevent collapse and raise the smoothness of the downward-facing surface.

(Left: 0.2mm, Right: 1.0mm)
Vertical Distance Between Object to Top\Bottom Surface of Support
(Left: 0 layer, Right: 1 layer)
The vertical distance between the object and the support top/bottom surface can be changed, and users can set the distance in layers. With 0 layers, the object and the support will stick together. This helps reduce the risk of prints failing, such as the overhang area collapsing.
When applying the same printing material for both object and the support, such as PLA filament, a distance setting of 0 layers will result in the support not easily breaking away from the object. But if the support is printed with PVA, the PVA support can be dissolved rather than broken away, which is far more useful and convenient.
The gap distance is calculated by the number of layers and the layer height. (If layer height is 2.0 mm, gap of 1 layer is 2.0 mm).
Dense Support

Dense support is created by increasing the density of a few interface layers between the object and the support structure. It can prevent extruded mesh from falling into intervals of the support structure.
Although such settings will increase the printing time and cost, these settings are still recommended if you want to increase printing stability and surface quality.

To change the setting, you can click on “Dense Support” tag next to “Support” tag.
Number of Dense Support Layers

The green part is normal support, and the blue part indicated by the red arrow is dense support.
You can change the number of dense support layers between the regular support structure and the object.
Generally, three layers are enough, but if you want to entirely remove support, it is suggested to increase the number of layers.
Dense Support in Bottom

Users can add dense support as initial layers in the bottom of the support structure.
Although dense support results in more printing time, it helps reduce the chance of printing failure by increasing the stability of PVA support.
Dense Support Infill Ratio

(Left: 80%, Right:100%)
You can set the density of the dense support area. This works the same as the infill density of the model itself. As density increases, the support structure grid will gradually become tighter while the interface between the model and support improves. Reducing the density can shorten printing time but it is suggested to keep density at least at 80%.