FFF • Dual Extrusion • High-Speed Printing up to 300mm/s • RFID Traceable Workflow
FFF • Dual Extrusion • HEPA Filter With Activated Charcoal • Up to 300°C
SLS • Low TCO • High Output • High-Precision Prints • Industrial and Functional Material
DLP • True DLP Precision • Faster Prints • RFID Traceable Workflow • Broad Resin Portfolio
DLP • High Resolution Resin Printing • RFID Traceable Workflow • Wide Range of Resin Compatibility
FFF • Dual IDEX • Flexible and Fiber-Reinforced Filaments • Enclosed Build Chamber
FFF • Dual IDEX • For Fiber-Reinforced Filaments • Dry Boxes • Enclosed Build Chamber
FFF • Dual IDEX • For Flexible Materials up to Shore Hardness 70A • Enclosed Build Chamber
Large-Format FFF (500 × 500 × 500 mm) • Dual IDEX • Carbon Fiber Composites & High-Strength Polymer
When you import the model into ideaMaker, the information of the model will be displayed in the lower right corner of ideaMaker, including model name, bounding box size, triangles, edges etc.

Figure 1 Model Information

Figure 2 Bounding Box
Note:
1) Local Transform refers to zoom scale based on model’s coordinate axis.


Figure 3 “Local Bounding Box”
2) Triangles refers to the number of triangles in the model. Model faces are subdivided into triangles. A model with a higher number of triangles will usually have a smoother surface effect, but will lead to system overloading.

Figure 4 Triangles
3) Edges refers to the number of edges in the model.

Figure 5 The number of edges.
4) Non-Manifold Edges refers to the number of non-manifold edges in the model. Generally, there are two types of non-manifold errors, one is an open object which means the model has holes or loose edges, another one is extra faces such as internal faces, overlapping faces etc.

Figure 6 Non-manifold edges
5) Error Orientation Faces refers to the number of error orientation faces in the model. In geometry, the orientation of an object (such as a line, a plane or a rigid body) is used to describe how it is placed in the space in which it is located. If the model is displayed in green, you’ll need to flip mesh orientation.

Figure 7 Model has an error
Note: You can select “Repair”> “Flip Mesh Orientation” on the Menu Bar to flip the orientation of the model.

Figure 8 Flip Mesh Orientation

Figure 9 Model Error Message

Figure 10 ideaMaker will automatically repair the errors

Figure 11 “Repair” menu
FFF • Dual Extrusion • High-Speed Printing up to 300mm/s • RFID Traceable Workflow
FFF • Dual Extrusion • HEPA Filter With Activated Charcoal • Up to 300°C
SLS • Low TCO • High Output • High-Precision Prints • Industrial and Functional Material
DLP • True DLP Precision • Faster Prints • RFID Traceable Workflow • Broad Resin Portfolio
DLP • High Resolution Resin Printing • RFID Traceable Workflow • Wide Range of Resin Compatibility
FFF • Dual IDEX • Flexible and Fiber-Reinforced Filaments • Enclosed Build Chamber
FFF • Dual IDEX • For Fiber-Reinforced Filaments • Dry Boxes • Enclosed Build Chamber
FFF • Dual IDEX • For Flexible Materials up to Shore Hardness 70A • Enclosed Build Chamber
Large-Format FFF (500 × 500 × 500 mm) • Dual IDEX • Carbon Fiber Composites & High-Strength Polymer
3D printers are becoming a more common piece of machinery within manufacturing and R&D. Investing in a 3D printer is quickly becoming an immediate necessity for more businesses. Businesses of any size can speed up production, prototyping, and manufacturing while creating the exact parts and components they need while cutting operating costs by incorporating 3D printing into their operations.
For companies to receive the full benefits of 3D printing, they need to invest in a 3D printer designed to be used by businesses. Purchasing a 3D printer is an important investment. Knowing which 3D printer is the right one for your business involves:
Raise3D understands that different businesses have different operational needs and resources. Therefore, we designed all our 3D printers with all businesses in mind. A 3D printer from Raise3D has a range of features and capabilities, prints efficiently, processes a range of 3D printing material and produces high-quality 3D printed parts.
Micro and small businesses generally operate with a stricter budget which can be a limiting factor. Therefore, they must be more cautious and concerned about effectively distributing their budget. However, medium and large businesses generally operate with a larger budget, which gives them the option to invest in more expensive printers, such as a metal 3D printer, that can cost upwards of $500,000.
While medium and large businesses do not face budget limitations to the same degree that micro or small businesses do, medium and large organizations face other obstacles. For example, not all engineers or departments within the organization get access to the company’s most advanced equipment, like a metal 3D printer. There will be a capacity limitation for those who do receive access to expensive equipment like a metal 3D printer.
Different business sizes face different limitations. A 3D printer designed to be used for business operations can address each kind of business limitation for businesses of all sizes.

A 3D printer intended for business will produce high-quality 3D printed parts. In general, a printer’s ability to produce high-quality 3D printed parts will result in a more expensive printer. However, a business’ size and amount of resources directly affects what type of 3D printer they can purchase.
For example, small and micro businesses have stricter budgets, so they need a 3D printer that is high quality but affordable. Meanwhile medium and large businesses have bigger budgets, but they can’t distribute enough expensive machinery (such as an expensive 3D printer) for everyone to use in the company. A more affordable high-quality 3d printer would give medium and large businesses the ability to meet their operational demand for accessibility. A 3D printer designed to be used by businesses can produce high-quality 3D printed parts at a price that is affordable for businesses. What constitutes an affordable 3D printer to a business will depend on the size of the business.
For a medium and large business, there are situations where an engineer’s prints can be executed by a 3D printer that is not so expensive to operate. For example, if the engineer needs to print a part that can be produced on the Pro2 dual extruder 3D printer, it will only cost a few dollars. In this situation, it does not make economic sense to use a million-dollar 3D printer to produce a part that can be done on a less expensive printer.
Other times, even though the company’s expensive 3D printer is ultimately needed to produce the 3D printed part, the part’s design may still need to be verified. In this situation, it makes more sense to verify the part’s design on a more cost-effective 3D printer before producing it on the expensive 3D printer.
3D printers that are priced affordably for businesses are also easier to implement across an organization. Due to the high cost of the initial sales price and maintenance of expensive 3D printers, expensive 3D printers are usually kept in an organization’s central location and run by specialists. However, a 3D printer that is affordably priced for businesses is more likely to be scattered across different departments, offices, locations, and run by multiple professionals ranging from engineers to designers.
Finally, due to the affordability of a 3D printer designed for business, departments are usually able to purchase a 3D printer with its budget. This shows that micro and small businesses are easily able to afford a 3D printer because a department’s budget is usually much smaller than the total budget of micro and small businesses.
A 3D printer designed for business needs to have a variety of features and capabilities, produce high-quality 3D printed parts, and process different kinds of 3D printing materials for all current and future projects at an affordable price for businesses of all types and sizes. Raise3D offers a range of 3D printers with a variety of features and specialized capabilities, designed with all businesses and budgets in mind.
Raise3D range of printers includes:

E2 Desktop 3D Printer

One feature all 3D printers from Raise3D have is the ability to connect to RaiseCloud. RaiseCloud is a cloud-based 3D printing management platform that is convenient for all businesses. RaiseCloud connects to a camera allowing the user to monitor the printing process remotely from a phone. RaiseCloud manages the printing projects to keep teams synchronized and any number of 3D printing projects on track. The ability to manage and monitor printing makes the team and ultimately business more productive and efficient.

RaiseCloud on Phone
Another feature all printers from Raise3D have are preventative measures to pause the print job in the event of a power outage or if the 3D printing material, also known as a filament, runs out.
For more details about 3D printers from Raise3D click here.
For a $5,000 budget Raise3D’s Pro2 dual extruder 3D printer and Raise3D’s E2 desktop 3D printer will be the best option while still leaving room in the budget for 3D printer accessories, parts, and filament.
For a $10,000 budget, a business has a couple of different printer purchasing options available. A business can purchase one Pro2 Plus large format 3D printer or two Pro2 or E2 3D printers for increased productivity. This purchase will still leave room in the budget for 3D printer accessories, parts, and filament.

Pro2 Plus Large Format 3D Printer
In general, Raise3D E2, Pro2, Pro2 Plus 3D printers are the best 3D printers for micro and small businesses for several reasons. A 3D printer designed for business from Raise3D has many features for a variety of different capabilities, including the ability to process more than one filament for any kind of current or future project. 3D printers from Raise3D produce high-quality 3D printed parts, and fit into a micro and small business’ budget.

Pro2 Dual Extruder 3D Printer
For medium and large businesses, the E2, Pro2, and Pro2 Plus from Raise3D are still the best 3D printer options, even though there are other more expensive 3D printers designed for other purposes. For medium and large businesses, it is more important to work the budget carefully across different equipment and technologies. For example, if a business has a $1 million budget, should the business spend it all on a single 3D printer or invest in 200 or more Pro2 dual extruder 3D printers? The answer is not absolute. A business can deploy 200+ Pro2 3D printers across the entire R&D team nationally or even globally. This will ensure the business’ entire R&D team will be able to get adequate access to 3D printing and improve a variety of business operations. This includes but not limited to increasing productivity while reducing cost, shorten the product’s R&D period, accelerate production, maximize the potential of the R&D team, and more. However, when it is necessary, it is a good idea for a business to invest in metal 3D printing as well.
Adopting 3D printers into business operations is becoming more common. Since each business has its own project needs, it is important to determine what kind of 3D printers will be worth the investment. 3D printers designed for business operations produce high quality 3D printed parts while remaining affordable. They improve efficiency and productivity while creating complex designs, prototypes and new parts in a shorter period of time.
All of Raise3D printers are designed to be used for business operations with specialized features and capabilities for any project. Raise3D printers will improve operations and productivity in the short and long term for businesses of all sizes. Contact us today for more information on how a 3D printer from Raise3D can improve your business and schedule a demo today.
FFF • Dual Extrusion • High-Speed Printing up to 300mm/s • RFID Traceable Workflow
FFF • Dual Extrusion • HEPA Filter With Activated Charcoal • Up to 300°C
SLS • Low TCO • High Output • High-Precision Prints • Industrial and Functional Material
DLP • True DLP Precision • Faster Prints • RFID Traceable Workflow • Broad Resin Portfolio
DLP • High Resolution Resin Printing • RFID Traceable Workflow • Wide Range of Resin Compatibility
FFF • Dual IDEX • Flexible and Fiber-Reinforced Filaments • Enclosed Build Chamber
FFF • Dual IDEX • For Fiber-Reinforced Filaments • Dry Boxes • Enclosed Build Chamber
FFF • Dual IDEX • For Flexible Materials up to Shore Hardness 70A • Enclosed Build Chamber
Large-Format FFF (500 × 500 × 500 mm) • Dual IDEX • Carbon Fiber Composites & High-Strength Polymer
The Duplication /Mirror Mode refers to the printing mode in which a printer with independent dual extruders prints two identical or symmetrical models at a time during the 3D printing process.
Duplication Mode means that the size, angle, and orientation of the two printed models are exactly the same; The two models printed in Mirror Mode are mirror-symmetrical.


Figure 1 Duplication Mode (top) and Mirror Mode (bottom)

Figure 2 Raise3D E2 prints two models at the same time
Prepare for Duplication Mode and Mirror Mode: Calibrate the Offset Value of the Nozzles and the Flatness of the Printing Plate.
A) On the E2 touch screen, select “Utilities>Leveling”, and then click the “Browse Data” icon to check the flatness of the printed board.
Note: It is not recommended to print in Duplication/Mirror Mode if the flatness of the printing plate should be less than 0.15mm.


Figure 3 Level the flatness of the printing plate

Figure 4 Operate offset calibration

Figure 5 Check the version of ideaMaker

Figure 6 Import the model

Figure 7 Enable Duplication/Mirror Mode
A) Normal Mode: Commonly used printing mode. Only a single model is placed in the center of the main interface.

Figure 8 Enable Duplication/Mirror Mode
B) Duplication Mode: It means that the left nozzle and the models printed by two nozzles are of the same size, angle, and orientation.

Figure 9 Duplication Mode
C) Mirror Mode: The printer will print two models that have the same size but are mirror-symmetrical.

Figure 10 Mirror Mode
D) You can adjust the position of the original model, and the model printed by another nozzle will change its position accordingly.

Figure 11 Model exceeds printing boundary
FFF • Dual Extrusion • High-Speed Printing up to 300mm/s • RFID Traceable Workflow
FFF • Dual Extrusion • HEPA Filter With Activated Charcoal • Up to 300°C
SLS • Low TCO • High Output • High-Precision Prints • Industrial and Functional Material
DLP • True DLP Precision • Faster Prints • RFID Traceable Workflow • Broad Resin Portfolio
DLP • High Resolution Resin Printing • RFID Traceable Workflow • Wide Range of Resin Compatibility
FFF • Dual IDEX • Flexible and Fiber-Reinforced Filaments • Enclosed Build Chamber
FFF • Dual IDEX • For Fiber-Reinforced Filaments • Dry Boxes • Enclosed Build Chamber
FFF • Dual IDEX • For Flexible Materials up to Shore Hardness 70A • Enclosed Build Chamber
Large-Format FFF (500 × 500 × 500 mm) • Dual IDEX • Carbon Fiber Composites & High-Strength Polymer
ideaMaker is a slicing software that can convert 3D models into G-Code instructions that can be recognized by 3D printers. ideaMaker is suitable for Raise3D equipment. If third-party equipment is used, you can also adjust the relevant parameters in ideaMaker.
Currently ideaMaker supports Windows, MAC, Linux32-bit and Linux64-bit systems.

Figure 1 Download the ideaMaker installation package
Microsoft Windows XP or later, 64-bit recommended
Mac OS X v10.10 or later
Ubuntu 14.04 or later
2GB of RAM, 8GB or more recommended
OpenGL 2.0-capable system
Intel® Core 2 or AMD Athlon® 64 processor; 2 GHz or faster processor
2.0 GB or more of available hard-disk space
1280 x 800 display with 32-bit color and 512 MB or more of dedicated VRAM

Figure 2 Uninstall the previous ideaMaker version

Figure 3 Close the ideaMaker running in background

Figure 4 Enter the ideaMaker installer

Figure 5 Read the installation license agreement

Figure 6 Select the installation path
Note: Microsoft Visual C++ 2008 SP1 Redistributable is auto checked by the installation software. If you have installed that in your computer before, you don’t need to select it again.

Figure 7 Select the components

Figure 8 The installation is complete

Figure 9 Complete the installation process

Figure 10 Run ideaMaker
A) The installation package was not fully downloaded. You can try to re-download the installation packaging.

Figure 11 The installation package was not fully downloaded
B) Error opening file for writing, if you encounter this error during installation, try to close the ideaMaker running in background via task manager, then click “Retry” to install again.

Figure 12 Close the ideaMaker running in background and click “Retry”
FFF • Dual Extrusion • High-Speed Printing up to 300mm/s • RFID Traceable Workflow
FFF • Dual Extrusion • HEPA Filter With Activated Charcoal • Up to 300°C
SLS • Low TCO • High Output • High-Precision Prints • Industrial and Functional Material
DLP • True DLP Precision • Faster Prints • RFID Traceable Workflow • Broad Resin Portfolio
DLP • High Resolution Resin Printing • RFID Traceable Workflow • Wide Range of Resin Compatibility
FFF • Dual IDEX • Flexible and Fiber-Reinforced Filaments • Enclosed Build Chamber
FFF • Dual IDEX • For Fiber-Reinforced Filaments • Dry Boxes • Enclosed Build Chamber
FFF • Dual IDEX • For Flexible Materials up to Shore Hardness 70A • Enclosed Build Chamber
Large-Format FFF (500 × 500 × 500 mm) • Dual IDEX • Carbon Fiber Composites & High-Strength Polymer
When users use 3D printers to print models in the early stages, they usually print only one model at a time until they get a satisfactory result. But when the model is composed of multiple parts, or when you want to print multiple model files at once, importing only one model at a time will increase your workload. This manual will teach you how import multiple models into ideaMaker at the same time.

Figure 1 Click the “+” button to import the models

Figure 2 Click “Import Models” to import model files.
Figure 3 Click the “Add” icon on the Tool Bar to import the model

Figure 4 Directly select multiple models

Figure 5 Import multiple models


Figure 6 Arrange All Models


Figure 7 Import the model file in .3MF format
FFF • Dual Extrusion • High-Speed Printing up to 300mm/s • RFID Traceable Workflow
FFF • Dual Extrusion • HEPA Filter With Activated Charcoal • Up to 300°C
SLS • Low TCO • High Output • High-Precision Prints • Industrial and Functional Material
DLP • True DLP Precision • Faster Prints • RFID Traceable Workflow • Broad Resin Portfolio
DLP • High Resolution Resin Printing • RFID Traceable Workflow • Wide Range of Resin Compatibility
FFF • Dual IDEX • Flexible and Fiber-Reinforced Filaments • Enclosed Build Chamber
FFF • Dual IDEX • For Fiber-Reinforced Filaments • Dry Boxes • Enclosed Build Chamber
FFF • Dual IDEX • For Flexible Materials up to Shore Hardness 70A • Enclosed Build Chamber
Large-Format FFF (500 × 500 × 500 mm) • Dual IDEX • Carbon Fiber Composites & High-Strength Polymer

Figure 1 Model layers after slicing
The slicing file is a file generated in the slicing software after adjusting the model parameters according to your printing needs. This slice file contains model-related settings (such as layer height, platform additions, support, etc.), as well as printer and nozzle settings. The slice file can be recognized and printed on a 3D printer. The general slice file format is .gcode, and ideaMaker will also generate special file in the .idea format.
FFF • Dual Extrusion • High-Speed Printing up to 300mm/s • RFID Traceable Workflow
FFF • Dual Extrusion • HEPA Filter With Activated Charcoal • Up to 300°C
SLS • Low TCO • High Output • High-Precision Prints • Industrial and Functional Material
DLP • True DLP Precision • Faster Prints • RFID Traceable Workflow • Broad Resin Portfolio
DLP • High Resolution Resin Printing • RFID Traceable Workflow • Wide Range of Resin Compatibility
FFF • Dual IDEX • Flexible and Fiber-Reinforced Filaments • Enclosed Build Chamber
FFF • Dual IDEX • For Fiber-Reinforced Filaments • Dry Boxes • Enclosed Build Chamber
FFF • Dual IDEX • For Flexible Materials up to Shore Hardness 70A • Enclosed Build Chamber
Large-Format FFF (500 × 500 × 500 mm) • Dual IDEX • Carbon Fiber Composites & High-Strength Polymer
The following file types can be exported to ideaMaker:
FFF • Dual Extrusion • High-Speed Printing up to 300mm/s • RFID Traceable Workflow
FFF • Dual Extrusion • HEPA Filter With Activated Charcoal • Up to 300°C
SLS • Low TCO • High Output • High-Precision Prints • Industrial and Functional Material
DLP • True DLP Precision • Faster Prints • RFID Traceable Workflow • Broad Resin Portfolio
DLP • High Resolution Resin Printing • RFID Traceable Workflow • Wide Range of Resin Compatibility
FFF • Dual IDEX • Flexible and Fiber-Reinforced Filaments • Enclosed Build Chamber
FFF • Dual IDEX • For Fiber-Reinforced Filaments • Dry Boxes • Enclosed Build Chamber
FFF • Dual IDEX • For Flexible Materials up to Shore Hardness 70A • Enclosed Build Chamber
Large-Format FFF (500 × 500 × 500 mm) • Dual IDEX • Carbon Fiber Composites & High-Strength Polymer
After you have installed ideaMaker and successfully run it, you can start your first printing. This tutorial will introduce how to print your model using ideaMaker for the first time. (This tutorial takes ideaMaker 4.0.0 Beta as an example).
1. Open ideaMaker and enter the ideaMaker welcome interface.
There are several sections in the welcome interface, you can access to each section, or you can skip the welcome interface.
Start the preliminary steps of printing.
Recently opened files.
Preliminary settings for model printing, including printer settings, filament settings, manage templates and preferences.
RaiseCloud is a cloud platform for monitoring and managing the multiple printing process.
ideaMaker Library is a sharing platform for users to share and download slice templates.
Access to the latest information and product-related resources of Raise3D.

Figure 1 Welcome to ideaMaker
2. Enter the configuration wizard settings. Close the welcome interface, the printer will appear the initial configuration wizard. You can follow the wizard to set your printer type, the number of extruders and the type of filament used.
A) Set your printer type.

Figure 2 Set your printer type
B) Set the number of extruders.

Figure 3 Set the number of extruders
C) Set the type of filament you use.

Figure 4 Set the type of filament you use
D) After completing the configuration wizard settings, you can enter the main interface of ideaMaker. For more settings about printers and filaments, please select the “Printer” on the menu bar, and select “Printer Settings” or “Filament Settings” to set the printer or filament.

Figure 5 “Printer Settings” or “Filament Settings”.
3. Import the model file after entering the main interface.
A) Click the “+” button to import a .STL, .OBJ or .3MF model file.

Figure 6 Click the “+” button to import a model
Note: If you find an error message in the prompt box in the lower right corner, you can click the “Repair” button on the menu bar to automatically repair your model.


Figure 7 Repair the model
B) Click “File” on the menu bar, and then click “Import Models” to import model files.

Figure 8 Import the model through the menu bar
C) Click the “Add” button on the Tool Bar to import the model.
Figure 9 Click the “Add” icon to import the model
1. The purpose of slicing is to convert the model file into a G-Code command that the printer can recognize. Because the principle of the Raise3D printer is to form the melted filaments layer by layer. So visually, slicing means dividing the model into countless printing layers.
2. Click “Start Slicing” to slice the model.

Figure 10 Click “Start Slicing” to slice the model
3. Select your printer type and filament type.
A) Select the printer type you use in the pop-up “Select Template” window. For example, if the printer you use is Raise3D E2, please select “Raise3D E2”.

Figure 11 Select the printer type
B) If you are not using a Raise3D series printer, you need to set up a third-party printer in ideaMaker. Click the Settings icon to enter the printer settings. You can set the printer parameters in the printer settings.
Figure 12 Click the Settings icon to enter the printer settings
C) You can click “Add/Duplicate” to add a third-party printer and configure the third-party printer.

Figure 13 Add a third-party printer
D) You can also click “Import” to import the printer settings in the local disk.

Figure 14 Import the printer settings from the local disk
E) Select the type of filament you use. There are many types and specifications of filaments in ideaMaker. It is recommended that you use Raise3D official filaments.

Figure 15 Select the type of filament
4. Select a slicing template, or click the “Copy” button to create a new template for the model based on the existing three templates. ideaMaker provides three default slicing templates: “Speed”, “Standard” and “High Quality”.

Figure 16 Select a slicing template
5. Select the template you need, and then click the “Edit” button or double-click the template. Select the Platform Addition and Support type, and then click “Save and Close”. (You can click “Advanced Settings” to modify other parameters. For specific settings, please refer to ideaMaker User Manual 5.1.3. Edit Template.)

Figure 17 Edit the slicing template

Figure 18 Click “Save and Close”
6. Click the “Slice” button to start slicing. ideaMaker will automatically slice the model.


Figure 19 Slice the model
7. After the slicing is completed, the system will pop up an “Estimated Print Result” for your reference. You can check the estimated printing time, estimated printing price and other information. You can upload the model to the printer here, or you can preview the slicing result first.
Preview the slice result.
You can upload the slice files to your printer, RaiseCloud and Octoprint.
Export the sliced file to local disk.

Figure 20 Estimated Print Result
8. Click the “Preview” button, you can view the slicing effect of the model.

Figure 21 Model preview interface
A) Drag the button to view the printing of the model layer by layer and step by step.

Figure 22 Check the model layer by layer
Note: You can check the retraction points with “Show Retraction”. Check one layer with “Only Current Layer”.
Figure 23 Check the retraction points with “Show Retraction”. Check one layer with “Only Current Layer”.
B) Select “Structure”, ideaMaker will show different structures in the model in different colors. The cyan refers to Support and Raft. The red refers to Outer Shell. The green refers to the Inner Shells. The yellow refers to Infill. The blue lines refer to the moving paths of nozzle.

Figure 24 View model structure
C) In addition, you can also preview the model by selecting “Extruder Color”, “Speed“, “Layer Height”.

Figure 25 Choose view type

Figure 26 View the model by extruder color

Figure 26a. View the model by print speed

Figure 27 View the model by model layer height

Figure 27a. View the model by model structure

Figure 28 Enable “2D” to check the current layer with orthographic view.
2. Now you will have four options to load the files to the printer.
Option 1: Export the sliced G-Code file to USB storage or SD card.
Option 2: Upload the sliced G-Code file to the printer via WLAN.
Option 3: Upload the sliced G-Code file to RaiseCloud.
Option 4: Upload the sliced G-Code file to OctoPrint.
Option 1 Export the sliced G-Code files to USB storage or SD card.
1. Click “Export” button in the Estimated Print Result window to export the sliced G-Code file.

Figure 29 Export the sliced G-Code file
2. Click “Export to Local Disk button” in main screen to export the sliced G-Code files.

Figure 30 Export the sliced G-Code files in the main view
3. Export the sliced file to a USB storage device or a folder in the computer. Then copy the G-Code file (.gcode file and .data file) to the USB storage device. It is important to copy two files.

Figure 31 Raise3D printer can support .gcode files and .data files
4. Insert the USB device into the printer, select “Print” and then select the USB storage device to find the print file, and start printing for the first time.

Figure 32 Select USB storage to find print files
Option 2 Upload the sliced file via WLAN.
1. Click “Upload to Printer” in the “Estimated Print Result” window to upload the G-Code file.

Figure 33 Upload to Printer
2. You can click “Upload to printer” button in main screen to upload the sliced G-Code files.

Figure 34 Click “Upload to Printer” to upload the sliced G-Code files
3. Click the upload button on the left, and then click “UPLOAD FILES TO LOCAL PRINTERS” to upload the G-Code file to local printers.

Figure 35 Upload the G-Code file in Upload Queue
4. Then you will see the Select Printer page. You can select the printer you want to print with here. And you also can rename the model in Select Printer page.

Figure 36 Select a printer you want to use from the drop list
5. After you upload the file, you can check the uploading progress in Upload Queue.

Figure 37 Check the uploading progress
6. After uploading is complete, you can start printing. Select the print file on the touch screen of the printer to print. Files uploaded by WLAN are stored in Local storage.

Figure 38 Local storage
Option 3 Upload the sliced file to RaiseCloud.
1. Click “Upload to RaiseCloud” button in main screen to upload the sliced G-Code files.
Note:

Figure 39 Upload the sliced file to RaiseCloud
Option 4 Upload the sliced files to OctoPrint.

Figure 40 Upload the sliced file to OctoPrint
1. After you successfully export the G-Code slice file and upload it to the printer, you can print your model on the printer.
A) Select “Local Storage” or “USB Storage”, and then find the file you want to print.

Figure 41 Choose the model you want to print
B) Click “Print” to print the model file.

Figure 42 Print the model
FFF • Dual Extrusion • High-Speed Printing up to 300mm/s • RFID Traceable Workflow
FFF • Dual Extrusion • HEPA Filter With Activated Charcoal • Up to 300°C
SLS • Low TCO • High Output • High-Precision Prints • Industrial and Functional Material
DLP • True DLP Precision • Faster Prints • RFID Traceable Workflow • Broad Resin Portfolio
DLP • High Resolution Resin Printing • RFID Traceable Workflow • Wide Range of Resin Compatibility
FFF • Dual IDEX • Flexible and Fiber-Reinforced Filaments • Enclosed Build Chamber
FFF • Dual IDEX • For Fiber-Reinforced Filaments • Dry Boxes • Enclosed Build Chamber
FFF • Dual IDEX • For Flexible Materials up to Shore Hardness 70A • Enclosed Build Chamber
Large-Format FFF (500 × 500 × 500 mm) • Dual IDEX • Carbon Fiber Composites & High-Strength Polymer
Before slicing the model in ideaMaker, you need to match your printer with ideaMaker, so that the slicing settings of the model will match the printer you are using. ideaMaker provides you with a variety of built-in printer types. If your printer is not in the list of ideaMaker supported printers, you need to manually configure the third-party printer in ideaMaker.
1. Make sure you have downloaded and installed ideaMaker.
Note: To upgrade or download ideaMaker, please visit the official website: https://www.raise3d.com/download/.
2. If you are configuring a third-party “printer” in ideaMaker for the first time, please select “Printer” in the menu bar, and then select “Configuration Wizard”.

Figure 1 Enter the Configuration Wizard
3. There is a preset list of all printers supported by ideaMaker in Printer Type. If your printer model is in the list, select it directly. If you want to add a third-party printer, select “Other (Third-party Printer)”.

Figure 2 Select “Other (Third-party Printer)”
4. In the “Add Printer” interface, you can set the specifications and parameters of the third-party printer here.
A) Modify the printer name and abbreviation.You can enter the name of the printer in “Printer Type”. For example, set the third-party printer to “new printer” here.“Printer Type Abbreviation” refers to the abbreviation of the printer model (optional).

Figure 4 Set the nozzle and other parameters.
B) Set the nozzle and build plate parameters according to your printer.
Note: This function is to check if models are placed outside of the extruder’s printing range.

Figure 5 Set “Distance From Border of Build Plate” to 20 mm

Figure 6 Set the shape of the build plate
Note: 1. This function works only for third-party printers.

Figure 7 Select the motion controller board
C) Set the relevant parameters of the extruder.

Figure 8 Select the number of extruders

Figure 9 Select the filaments used
D) Set the Sequential Printing

Figure 10 Sequential Printing
5. Set the G-Code file export method. When slicing, you can export the slice file to a local disk, and you can also upload the slice file to a printer or upload to the RaiseCloud and the OctoPrint.

Figure 11 Set the G-Code file export method
Here you can fill in the URL and API key to setup OctoPrint.

Figure 12 Configure the OctoPrint.

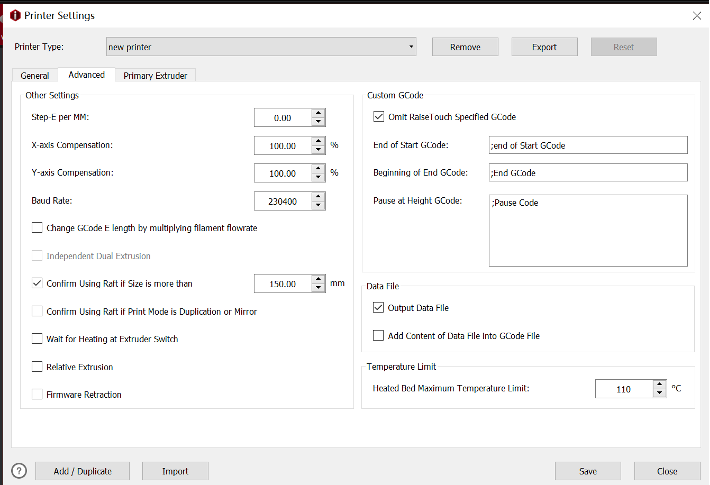
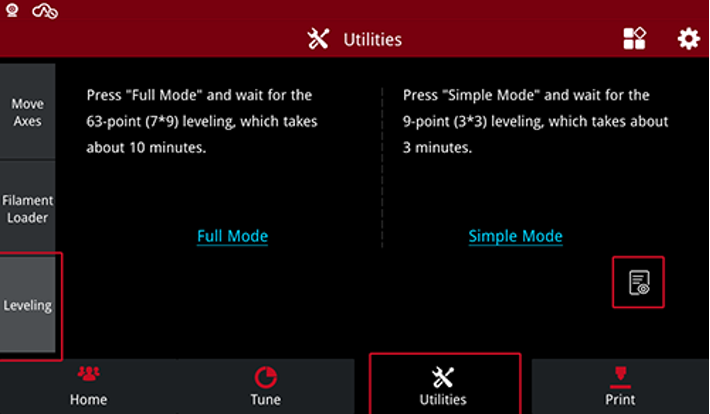
Figure 13 Advanced settings interface
1. After you complete the general settings of the printer, you can set the advanced settings of the printer.
D)
“Step-E per MM” refers to the steps required to extrude 1mm filament.
E)
“X-axis compensation” refers to model size compensation in X axis. “Y-axis compensation” refers to model size compensation in Y axis.
Note: Dimensional deviation may be caused by filament flow rate, mechanical deviation (such as belt tension) and so on. This function only works for XY axis mechanical deviation.
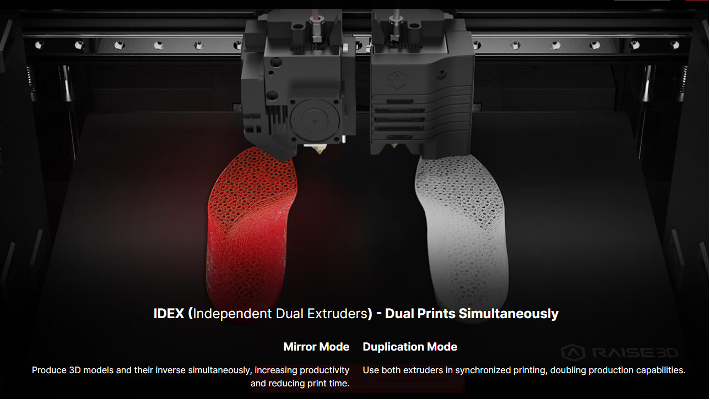
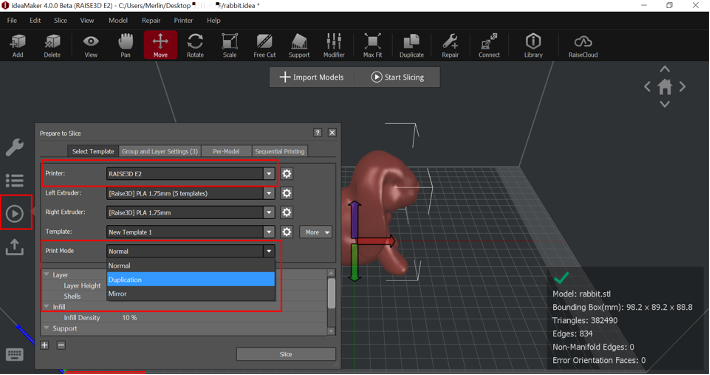
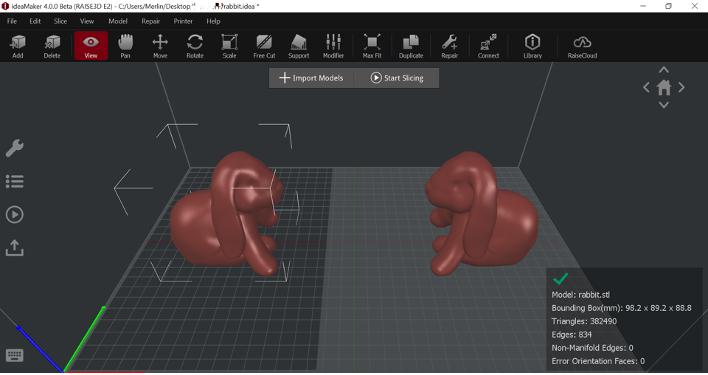
F)
“Independent Dual Extrusion”, with this function enabled, ideaMaker will allow printing with Duplication and Mirror mode.
Note: The printer should have at least two print heads for this feature. For Raise3D printers, only E2 printers can enable this function.
G)
“Confirm Using Raft if Size is more than”, with this function enabled, ideaMaker will automatically measure the model’s width and depth and print with a raft if it is bigger than set value. “Confirm Using Raft if Printing Mode is Duplication or Mirror”, with this function enabled, ideaMaker will automatically printing raft when the Duplication or Mirror mode is selected.
Note: The default value is 150mm.
H)
“Wait for Heating at Extruder Switch” when this function is enabled, the system will wait for heating to the target temperature for switching extruders.
I)
when this function is enabled, the system will output relative E values instead of absolute values in the G-Code files.
Note: 1. This function works only for third-party printers.
2.Make sure the printer firmware supports the relative extrusion before using this function.
with this function enabled, the retraction and restart commands of G1 will be replaced by G10/G11.
Note:

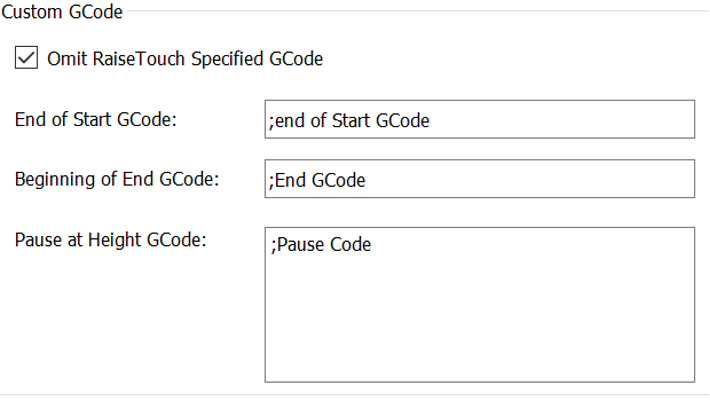
Figure 14 Set up Custom G-Code
with this function enabled, ideaMaker will not export Data file, and it will lead to that the models preview images can’t be displayed in touchscreen.Figure 15 Set up the Data File.
refers that with this function enabled, the information of .data files will be add into the G-Code file, and the G-Code file can be import into ideaMaker as a template slicing file.
Note: For third-party printer, it is recommended that this option can be turned off to improve compatibility.

Figure 16 Set the maximum temperature limit
1. You can set the offset amount from the left side of the main extruder to the nozzle; the offset amount from the right side to the nozzle; the offset amount from the front side to the nozzle and the offset amount from the back side to the nozzle. For more information, please refer to 8.3 Extruder Settings.

Figure 17 Set the offset amount of the left extruder.
2. Set temperature limits for your extruder. It all depends on the temperature limit of the hot end you use.

Figure 18 Set temperature limits for your extruder.
3. When you finishing the setting, click “Save”. Go back to the configuration wizard again, select your printer name “new printer”, confirm the number of extruders, the heated plate and the filament used. After all settings are complete, you can import your model for printing.

Figure 19 Finish the Configuration Wizard.
1. If your printer has the IDEX system (with two independent extruders), you need to configure the two extruders when configuring your third-party printer.
For example, select a third-party printer in the Configuration Wizard and name the new printer “new printer 1”. Select the number of extruders as 2, and set the filaments used for each extruder. Then set your left and right nozzle diameters and print bottom plate.


Figure 20 Create a two-nozzle printer.
2. Enter advanced settings, when your printer is equipped with independent dual extruders, check “Independent Dual Extrusion”, ideaMaker enables you to print in Duplication and Mirror mode.

Figure 21 Check “Independent Dual Extrusion”.
3. If you use Duplication and Mirror mode to print, check “Confirm Using Raft if Printing Mode is Duplication or Mirror”. When you print in Duplication or Mirror mode, there may be a slight offset between some nozzles. Therefore, enabling Raft will help to ensure that your nozzle doesn’t dig into the bed on one side. While the other one is printing perfectly fine.
4. Check “Wait for Heating at Extruder Switch” to ensure that when one extruder is switched to another, the hot end has fully heated up. Other settings are as set in Part 2.

Figure 22 Check “Wait for Heating at Extruder Switch”.
5. Enter the Left Extruder setting, set the offset value and maximum limit temperature of the left nozzle.

Figure 23 Set the offset value of the left nozzle.
6. Enter the Right Extruder setting, you can set the offset value X and offset value Y. If the offset value X and the offset value Y are both 0mm, you will get a virtual extruder offset. For more information, please refer to ideaMaker User Manual 8.3 Extruder Settings.

Figure 24 Set the right nozzle offset value.
7. When you have completed the settings, you can finish the configuration wizard and start to print.