Reading Time: 25 Minutes
3D printing is shaking up the orthotics industry, speeding up the process of creating custom devices and making them more accessible than ever. What once took weeks to design and produce, now happens in just hours. With the help of digital foot scans and advanced 3D printing technology, companies like Raise3D can quickly craft orthotic insoles that are perfectly tailored to your feet, delivering personalized comfort in a fraction of the time.
The 3D printed prosthetics market, valued at USD 1.3 billion in 2022, is expected to grow rapidly at a 7.7% annual rate through 2030. As this technology grows, it continues to reduce waste, speed up production, and offer custom-fit solutions that were once unimaginable. Using powerful software like ideaMaker, practitioners can fine-tune every detail to make sure the orthotics meet your needs exactly.
In this article, we’ll focus on how 3D printing is transforming the orthotics industry, improving patient care, and making customized solutions more accessible and efficient.
Can You 3D Print Orthotics?
Yes, 3D printing is a powerful solution for creating custom foot and lower-limb support, including orthotic insoles. The process begins with capturing detailed foot geometry, often through 3D scanning or gait analysis. This data allows for the creation of highly accurate, personalized orthotic profiles. Modern 3D printers are capable of printing both rigid and flexible materials, making them versatile enough to produce a wide range of orthotic devices, from rigid shells to soft full-length insoles. The ability to customize these devices to each patient’s unique needs is a major advantage over traditional methods.
Orthotic insoles, for example, benefit significantly from 3D printing as it allows for intricate designs that accurately reflect the foot’s complex shape. The first step in the process is scanning, which captures detailed data on the foot’s structure, pressure points, and movement patterns. This data is then used to generate a customized orthotic that fits the patient’s foot perfectly, improving comfort, support, and overall effectiveness.
How Do 3D Printed Orthotics Compare to Traditional Methods?
3D printed orthotics offer several advantages over traditional manufacturing methods, such as foam impressions, plaster casting, vacuum forming, and CNC milling. Traditional methods can take anywhere from 3 to 6 weeks, whereas 3D printing dramatically shortens this timeline, often reducing production to just a few days or even hours. One of the major distinctions is that manual techniques rely on highly skilled technicians, which can introduce human error in measurements and mold-making.
With 3D printing, the digital workflow eliminates many of these manual steps, resulting in increased accuracy and repeatability. The process starts with scanning, which captures precise foot geometry and gait data, allowing for highly customized designs. Although the initial setup cost of 3D printing equipment may be higher, the long-term benefits—such as reduced material waste, fewer labor requirements, and on-demand manufacturing—often outweigh the lower upfront costs of traditional methods.
What are the Mechanical Performance Differences?
3D printed orthotics are rigorously tested for durability and comfort to ensure they meet the same standards as traditional orthotics. Common tests include flex tests and load-bearing analyses to assess the material’s longevity under daily use. Materials such as those used in Selective Laser Sintering (SLS) and Stereolithography (SLA) printing can be engineered with internal lattice structures to provide targeted support and flexibility, making them ideal for creating custom orthotics that cater to a patient’s specific needs.
Furthermore, 3D printed orthotics can be made with materials like specific polymers and elastomers, which provide strength and comfort comparable to—or even exceeding—conventional thermoplastics. Research suggests that when properly post-processed, 3D printed insoles can last as long as traditionally manufactured polypropylene inserts. This durability is achieved by carefully selecting materials and incorporating appropriate design elements, making 3D printed orthotics an excellent alternative to traditional methods.
What are the Benefits of 3D Printing Orthotics?
3D printing offers multiple benefits when it comes to creating custom orthotics, such as custom orthotic devices and insoles. The primary advantage is the ability to create a perfect custom fit for each patient, taking into account their unique foot geometry and real-time gait data. With 3D printing, production times are drastically reduced compared to traditional methods, going from weeks to mere hours or days. This reduction in lead times allows for faster, on-demand manufacturing, which is particularly valuable for both healthcare providers and patients.
On top of that, 3D printing enables highly personalized designs. Using dynamic data such as gait analysis, practitioners can fine-tune the orthotics to meet each patient’s biomechanical needs. The technology allows multiple orthotics to be printed simultaneously, which increases clinic efficiency and reduces wait times. Furthermore, 3D printing is more sustainable than traditional subtractive methods, as it generates less waste and minimizes the need for excess materials.
Improves Fitting
One of the biggest advantages of 3D printing in orthotics is the improvement in fitting. By using patient-specific measurements and real-time data, 3D scanning can capture the precise geometry of a patient’s foot, including intricate details like arch height and pressure points. This data can then be used to design orthotics that fit perfectly and provide optimal support.
In addition to scanning, ongoing data such as gait analysis allows for adjustments to be made digitally. For example, software tools can help refine pressure zones or modify the thickness of the orthotics in certain areas. This level of personalization is difficult to achieve with traditional methods, making 3D printing a superior option for ensuring a custom fit.
Speed Up Production and Saves Time
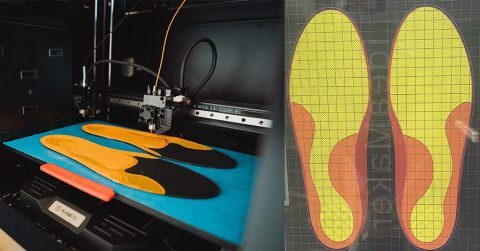
3D printing orthotics can drastically speed up the production process, delivering custom orthotic devices in a fraction of the time it takes with traditional methods. Where traditional approaches like CNC milling and manual labor might take weeks to complete, 3D printing can cut lead times to just hours or days. For instance, orthotic insoles can be printed in as little as 2-3 hours on a Raise3D E2 printer, with the entire workflow—scanning, modeling, and printing—often completed within 24 hours. This improvement not only accelerates turnaround times but also enables multiple orthotics to be produced simultaneously.
The Independent Dual Extruder (IDEX) technology of the Raise3D E2 is a significant game-changer. This feature allows two insoles (or two smaller sets) to be printed at once, effectively halving production times. Furthermore, 3D printing eliminates the need for repeated mold-making or extensive trial fittings. With iterative design changes being handled digitally, the process becomes more efficient, reducing manual labor and extensive post-processing. This also translates to lower costs in the long run, as the need for specialized labor is reduced.
Streamlines Workflow
The shift to a fully digital workflow from scan to print is one of the most notable advantages of 3D printing orthotics. Using tools like Raise3D’s ideaMaker slicing software, this streamlined approach reduces reliance on traditional processes like casting, trimming, or shell modifications. The software offers built-in profiles for materials like TPU and PP, making it easy to customize the mechanical properties of each orthotic to suit individual patient needs.
With the Raise3D E2 printer and its advanced IDEX technology, clinics and hospitals can manage production remotely through RaiseCloud. This cloud-based platform allows staff to monitor print progress in real-time and manage multiple jobs simultaneously. This reduces the need for constant physical presence around the printer, freeing up staff for other tasks. Additionally, the user-friendly design of Raise3D printers ensures that even medical professionals without manufacturing experience can quickly learn to operate the system. This combination of scanning, CAD modeling, slicing, and printing is intuitive and integrates seamlessly into clinical workflows, further optimizing time and resources while ensuring high-quality patient care.
Reduces Budget
3D printing orthotics offers significant budgetary benefits, especially for clinics looking to optimize their production processes. While the initial investment in a 3D printer and materials may be higher than traditional methods, the long-term savings quickly add up. Raise3D printers, such as the E2 model, utilize Fused Filament Fabrication (FFF) technology, which reduces overhead costs. Unlike traditional methods that require a range of specialized equipment (e.g., CNC machines, molds, and large material stock), Raise3D’s all-in-one system simplifies the production process, lowering operational expenses.
On a per-unit basis, 3D printed orthotics become cost-competitive once a clinic is fully set up. The use of filament is efficient, and material storage is less expensive than managing large blocks of material for CNC milling. Additionally, 3D printing can scale production by adding more Raise3D printers rather than expanding with larger CNC machines. The compact footprint of each printer makes it easy to establish a 3D printing farm, even in smaller spaces.
A fast return on investment (ROI) is another advantage. Case studies show that clinics can offset the cost of the Raise3D E2, including the printer, software, and materials, after producing a modest number of insole pairs.
Improves Sustainability and Efficiency
3D printing orthotics is inherently more sustainable and efficient than traditional manufacturing methods. Unlike subtractive processes such as CNC milling, which generate significant amounts of waste, 3D printing is an additive process, meaning it only uses the material required for the design. This leads to far less scrap material, contributing to both cost savings and environmental sustainability.
Raise3D printers, such as the E2, offer further benefits in terms of sustainability. The use of high-quality filaments like TPU ensures that only the necessary material is used, and excess material is minimized. Additionally, certain powders and filaments can be reused, further reducing waste and costs. The ability to print multiple orthotics at once helps to reduce energy consumption, making the process more efficient compared to traditional methods.
Another key feature of Raise3D printers is the enclosed build chamber with HEPA filtration. This significantly reduces the fumes and dust commonly created by milling EVA or polypropylene blocks. The filtered air and quieter operation also contribute to a cleaner, safer workspace, without the need for large, dedicated workshop spaces.
Provides More Material Options
3D printing orthotics allows for a wide range of materials to be used in the creation of custom orthotic devices. Raise3D printers, for instance, can handle various materials including flexible TPU (thermoplastic polyurethane) and durable polypropylene (PP), both of which are commonly used for insoles. TPU is valued for its flexibility and comfort, making it ideal for cushioning and shock absorption, while PP offers durability and support, making it well-suited for the structural elements of orthotics. This versatility gives practitioners the ability to choose materials based on the unique needs of their patients.
One of the standout features of Raise3D’s printing technology is the ability to control hardness distribution across different regions of the insole. Through Raise3D’s ideaMaker slicing software, practitioners can adjust the infill patterns, density, and other parameters to create varying levels of support in specific areas. This fine-tuned control allows for tailored solutions—something that is difficult and costly to achieve using traditional orthotic manufacturing methods.
3D-printed orthotics also offer significant improvements in durability and comfort. The materials used in the process retain their shape and strength over time, ensuring that the orthotics provide consistent support and comfort, even with prolonged use.
Customized Orthotics Lead to Better Results

Customized orthotics produced via 3D printing offer several distinct advantages over off-the-shelf solutions, particularly in patient comfort, foot health, and overall satisfaction. By creating a personalized insole that perfectly matches a patient’s unique foot shape and gait data, 3D printing ensures that pressure points are relieved more effectively. This not only improves comfort but also contributes to better foot health by providing targeted support where it’s most needed.
When orthotics are tailored specifically to a patient’s needs, the result is often improved compliance and faster recovery. Unlike generic insoles, custom orthotics can be adjusted for the specific corrective solutions that a patient requires, whether it’s increased arch support, heel stabilization, or corrections for overpronation. With the ability to make digital adjustments based on real-time data such as gait analysis, 3D printing ensures that each orthotic delivers the highest level of support and functionality.
Additionally, 3D printing guarantees better consistency and reliability. Traditional thermoformed or milled insoles can vary in quality, as their production relies heavily on manual techniques and operator skill. However, 3D printing yields reproducible results with a consistent quality that supports more predictable, stable treatment outcomes. If adjustments are needed, the process is simple: just update the design parameters in CAD software and reprint the orthotic, enabling rapid iterations and easy reorders.
What are the Specific Advantages for Clinicians?
For clinicians, 3D printing orthotics offers numerous operational and financial benefits. One of the most significant advantages is the reduction in lead times, allowing for faster turnaround from concept to finished orthotic. Traditional methods can be slow and labor-intensive, but 3D printing streamlines the process, cutting production time to hours or days instead of weeks. This allows clinics to offer quicker service, improving patient satisfaction and increasing the clinic’s throughput.
Additionally, 3D printing reduces in-office inventory requirements, as clinicians can print orthotics on demand. This minimizes the need to store physical stock, freeing up valuable space and capital. Financially, the ability to create custom orthotic devices on-site could lead to higher reimbursement rates, especially for personalized treatments. Patients are often willing to pay more for tailored solutions, making 3D printing a cost-effective choice in the long run. Moreover, satisfied patients often share their experiences through positive word-of-mouth, driving repeat business and growing the clinic’s reputation.
True Customization
3D printing offers the true customization of orthotics, ensuring that each device is perfectly suited to the patient’s unique foot geometry. With 3D scanning, practitioners can capture precise details of the foot, including its shape, arches, and pressure points. Digital design tools allow direct manipulation of thickness, curvature, and support zones, ensuring a personalized fit that can address the patient’s specific needs. This level of precision ensures the orthotic is comfortable and effective, improving patient satisfaction and outcomes.
Reduce In-office Inventory
3D printing orthotics allows clinics to reduce in-office inventory by producing orthotics only when needed. On-demand printing eliminates the need for large stockpiles of pre-made orthotics, freeing up physical space and reducing the amount of capital tied up in inventory. This approach is not only cost-effective but also helps streamline the clinic’s workflow, making it easier to manage resources efficiently. With the ability to print custom orthotics on demand, clinicians can respond quickly to patient needs without worrying about overstocking or running out of suitable sizes.
How Do Pediatric Needs Differ From Adult Orthotic Requirements?
Pediatric orthotics require special considerations due to the unique growth patterns of children. As children’s feet continue to grow, their orthotics need to be adjusted more frequently, making 3D printing an ideal solution. Unlike traditional methods, which may require new molds or time-consuming alterations, 3D printing allows for quick updates to the design and reprints as needed. Pediatric orthotics also require smaller build sizes and careful attention to comfort and compliance. The lightweight nature of 3D-printed materials and the ability to customize the fit to a child’s specific needs ensures a more comfortable experience. Additionally, regulatory considerations may vary for pediatric orthotics, requiring careful attention to safety and fit-testing standards.
How Does the 3D Printing Process for Orthotics Work?
The 3D printing process for orthotics involves several key steps that streamline production and improve the overall efficiency of creating custom devices. Here’s a step-by-step breakdown:
- Scanning: The process begins with capturing a detailed 3D scan of the patient’s foot. This usually takes 5 to 10 minutes per patient, providing high-resolution data on the foot’s geometry, including its arches, pressure points, and any deformities or irregularities.
- Modeling: After scanning, the data is used to create a digital model in specialized CAD or orthotic-design software. Depending on the complexity of the design, this step can take anywhere from 10 to 60 minutes. The model is adjusted for custom features like arch support, heel stabilization, and foot shape corrections.
- Slicing/Printing: Once the model is finalized, the next step is to slice the 3D model into layers and prepare it for printing. The slicing time typically takes about 1.5 to 6 hours to print a pair of insoles, depending on the material and design complexity. In some cases, printing can even run unattended, allowing for more efficient use of time.
- Finishing: After printing, the orthotics require some post-processing to enhance their comfort and usability. This includes applying a topcoat and performing any final trimming or adjustments, typically taking around 20 minutes.
Foot and Leg Scanning and Data Acquisition
The first and crucial step in designing custom orthotics is acquiring high-resolution anatomical data of the patient’s foot. 3D scanners, such as ScanPod3D or UPOD-S, are specifically designed for orthopedic and podiatric use, capturing precise foot geometry in just a few minutes. These handheld devices provide detailed information on the foot’s shape, arches, pressure points, and any anatomical irregularities, all of which are essential for creating a custom orthotic solution.
The scanning process gathers not just the external shape but also volumetric and topographical data. This data is then fed directly into CAD software, enabling the design of orthotics that perfectly match the patient’s foot. The output is typically in the form of STL files or images, which can be shared with medical professionals or used to generate 3D models.
By using 3D scanning, clinicians eliminate the need for traditional casting or molding, which can be messy, time-consuming, and prone to errors. Digital files are easy to store, share, and edit for future reference, making the process more efficient and precise.
Gait Analysis
Gait analysis plays a crucial role in refining the design of custom orthotics. By capturing real-time gait data, practitioners can identify key factors such as pressure points, stride irregularities, and pronation or supination issues. This dynamic data not only helps in creating orthotics that are statically accurate but also ensures they provide proper support and comfort during movement.
When gait data is integrated into the design process, the resulting orthotic can adapt to the unique biomechanics of the patient’s walk. It ensures that pressure distribution is more even and provides targeted support where it’s needed most. The process of incorporating this data adds precision, turning what could be a static support device into a functional, movement-responsive solution.
Design Generation
Design generation for 3D printed orthotics is enabled by specialized CAD or orthotic-design software, which is integral to converting foot scan data into a functional design. Programs like LutraCAD or IsoleCAD allow professionals to create custom orthotics tailored to the patient’s specific needs. The software can import scanned data from the foot, allowing precise customization of the orthotic design to improve factors such as arch support, heel stabilization, and pressure redistribution.
The key benefits of this process lie in its flexibility. Practitioners can adjust thickness, density, and structural elements within the design using parametric or procedural modeling tools. These tools let you fine-tune the mechanical properties of the insole, which is essential for optimizing both rigidity and flexibility. This customization allows for a perfect fit to the foot’s unique shape and gait patterns.
An important aspect of the design generation process is simulating load-bearing and stress points. By analyzing how the orthotic will handle the weight and pressure from walking, running, or standing, clinicians can predict the orthotic’s effectiveness. These simulations help ensure that the final product not only fits perfectly but also performs well under real-world conditions.
The final result is an STL file, ready for 3D printing. This digital workflow eliminates much of the guesswork and human error that comes with traditional manual fabrication, leading to faster production, better fit, and higher-quality results. For the patient, this translates into more comfort and better long-term support.
3D Slicing and Parameter Optimization
When creating custom orthotics, the 3D slicing process is vital for determining the mechanical properties and comfort of the final product. This step involves setting specific print parameters, such as layer height, infill percentage, infill pattern, and printing temperature, all of which directly impact the rigidity and flexibility of the orthotic.
Software like ideaMaker from Raise3D simplifies this process by offering preset templates tailored for specific materials such as TPU (thermoplastic polyurethane) and PP (polypropylene). These templates help in optimizing the design based on the material’s characteristics.
Different infill patterns, such as honeycomb or gyroid, allow for adjustments in the orthotic’s support properties. For instance, a honeycomb pattern may provide a lightweight structure with varying degrees of rigidity, while a gyroid pattern can offer enhanced flexibility. Fine-tuning infill density and angle ensures that the orthotic matches the patient’s biomechanical needs, addressing specific areas like arch support or heel stabilization.
Additionally, ideaMaker provides the ability to remotely send print jobs to the 3D printer and track progress via RaiseCloud, streamlining the entire workflow and reducing the need for manual intervention.
Manufacturing the Orthotic
The process of manufacturing the orthotic involves various 3D printing techniques, each suited for different material requirements. FDM (Fused Deposition Modeling) is often used for materials like TPU and PP, where a direct drive extruder ensures that flexible filaments are handled efficiently.
Powder-based methods like HP Multi Jet Fusion and Selective Laser Sintering (SLS) are also utilized for their ability to produce highly durable parts with complex geometries. These methods are ideal for creating orthotics with specific performance characteristics, such as durability and resistance to wear.
The orientation of the printed object on the build platform is another critical factor. The orientation affects the way the material settles and provides support. Proper placement ensures that the orthotic will be structurally sound and functional, maximizing the use of support structures and optimizing overall print success.
Finishing and Post-Processing
After printing the orthotics, finishing and post-processing are essential steps to ensure the final product is comfortable, durable, and functional. Post-processing techniques focus on smoothing surfaces, removing any support material, and adding comfort layers or topcoats that contact the patient’s foot. These steps are crucial for achieving the desired fit and aesthetic appeal.
Support material removal can be a challenge, particularly with flexible plastics. Adjustments to contact Z-distance in slicing software settings, such as Raise3D’s ideaMaker, can help in managing these issues. After the removal of support structures, light sanding or trimming may be necessary to remove minimal artifacts left from the printing process.
Adding topcoats is another key part of the post-processing stage. Typically, EVA foam, leather, or memory-foam-like materials are glued to the insole. These topcoats serve multiple purposes: they protect the printed structure, improve comfort by adding cushioning and shock absorption, and enhance hygiene and aesthetics. The finishing process takes about 10–20 minutes, depending on the complexity of the orthotic design.
The final insole is now perfectly tuned to the wearer’s comfort and style preferences. Additionally, the materials used for these topcoats are relatively inexpensive, making them a cost-effective solution for enhancing the orthotic’s overall quality.
Why Should You Analyze Mechanical Performance?
Mechanical performance testing is essential to ensure that 3D printed orthotics are durable and reliable. Common testing methods include flex tests and load-bearing analysis to assess the strength and resilience of the orthotic under different conditions. These tests provide valuable insights into the performance of the orthotics, which can guide improvements in future designs.
Analyzing mechanical data also helps fine-tune the design to ensure it offers the right balance of flexibility and support for the patient. For example, pressure points and load distribution can be optimized by using data from gait analysis or real-time walking patterns.
Compliance with medical device standards often requires rigorous mechanical validation, so manufacturers need to ensure their orthotics meet the necessary durability and comfort specifications.
What are Common Applications for 3D Printed Orthotics?
In sports medicine, orthotics can be customized to support athletic performance, prevent injuries, and correct stride imbalances. For pediatrics, 3D printing allows for the creation of growing orthotics that can be adjusted as children’s feet change over time. In diabetic foot care, custom orthotic insoles help prevent pressure sores and improve overall comfort, ensuring patients maintain mobility without risking additional health complications.
By using digital design tools, orthotics can be crafted for specific foot conditions, like flat feet, plantar fasciitis, and heel spurs, improving patient comfort and treatment outcomes. The ability to customize the design based on real-time data, gait analysis, and specific biomechanical needs enhances efficacy in every scenario. Tailoring orthotics to fit individual foot shapes and activities ensures that patients receive the most effective treatment possible.
Orthotic Insoles
3D printed orthotic insoles are designed to provide essential foot support, correct gait, and alleviate common foot issues such as plantar fasciitis and flat feet. The customization offered by 3D printing ensures that each insole matches the unique needs of the patient. By adjusting the arch support, thickness, and cushioning, practitioners can create a more comfortable and functional solution, enhancing the patient’s mobility and reducing discomfort. This personalization leads to better overall results compared to off-the-shelf insoles, offering patients an individualized experience.
Nose Protection Masks
In post-surgery care, 3D printed nose protection masks offer crucial support. These masks are designed to protect the nose after injury or surgery while ensuring comfort and breathability. The use of 3D scanning allows for a precise fit that contours perfectly to the patient’s face, without impeding airflow or causing discomfort. Custom nose protection masks are particularly beneficial in providing recovery support, as they allow for adequate protection during the healing process, all while maintaining a comfortable fit. These custom-designed masks also offer better aesthetics and a less intrusive recovery experience.
Raise3D Applications
Raise3D has been a key player in advancing orthotics production through its reliable 3D printing technology. Below, we’ll explore several case studies that demonstrate how Raise3D printers, such as the E2 and IDEX-equipped models, have been employed for innovative and customized orthotic solutions.
- Case Study 1 – Dr. Mirko Valenti and CREA3D
Dr. Mirko Valenti, a podiatrist, collaborated with CREA3D to adopt 3D printing technology for faster, more precise orthotic production. Focusing on patients with conditions like posterior tibial tenosynovitis, Dr. Valenti used a Raise3D E2 3D printer equipped with IDEX technology and polypropylene (PP) filament. The result was faster production times—nearly 24 hours—compared to traditional methods like CNC milling. The ability to print both insoles simultaneously not only enhanced efficiency but also allowed for the creation of tailor-made insoles that better supported patients’ biomechanical needs. The use of Raise3D’s ideaMaker slicing software enabled precise internal structural adjustments to match the specific mechanical requirements for different foot conditions, ensuring optimal comfort and durability for patients.
- Case Study 2 – Four-Stage Production Workflow in Orthopedic Salons
In this case study, a streamlined four-stage production workflow was implemented using Raise3D E2 printers. Feet were scanned with specialized hardware like ScanPod3D, modeled using IsoleCAD software, and then 3D-printed with flexible TPU on the Raise3D E2. This workflow not only reduced labor costs but also improved speed and cost-effectiveness. The printers’ direct drive extrusion system handled TPU material seamlessly, producing high-quality insoles in just 2 hours and 45 minutes. The final stage involved adding top covers such as EVA, leather, or memory foam to ensure patient comfort. This solution is scalable and provides affordable, customized orthotics that meet the needs of both small clinics and larger production centers.
- Case Study 3 – LutraCAD B.V.
LutraCAD B.V., a company based in the Netherlands, developed specialized software solutions for orthopedics and podiatrists across more than 100 countries. By partnering with Raise3D, LutraCAD integrated its software with the Raise3D E2 printer to replace traditional milling with 3D printing. This partnership led to a dramatic reduction in manual labor, material waste, and workspace clutter. The enclosed printing environment with HEPA filtration improved workplace safety by eliminating dust. Moreover, production time was reduced by approximately 50%, allowing practitioners to create 3D-print-ready files and send them directly to the printer for rapid production of custom insoles. This efficient solution, which utilizes TPU or PP filaments, significantly minimized post-processing requirements, streamlining the entire workflow for practitioners.
- Case Study 4 – 3D Printing Clinic at an Innovative Hospital
An innovative hospital’s 3D Printing Clinic adopted the Raise3D E2 for in-house orthotic production. This initiative was driven by the need to reduce labor costs, enhance cleanliness, and speed up production to accommodate more patients. The clinic combined 3D foot scanning with biomechanical design, enabling them to print a pair of custom insoles in just two hours using the E2’s IDEX system. The ideaMaker software was used to fine-tune the infill structures of each insole, ensuring the right balance of rigidity and flexibility for optimal comfort and support. This cost-effective and time-efficient solution not only reduced reliance on traditional CNC-based methods but also improved the hospital’s ability to provide customized orthotic solutions at a faster pace.
- Case Study 5 – Sooley in Konstanz, Germany
Sooley, an environmentally-conscious company based in Konstanz, Germany, provides custom orthotic insoles using Raise3D E2 printers. Sooley’s goal is to offer sustainable, personalized insoles to a global market. They developed a custom mobile app to scan feet in 3D, which feeds accurate data into their design process. The insoles are printed using TPU with varying Shore hardness to accommodate different levels of comfort and support. Thanks to the E2’s direct drive and duplication modes, Sooley efficiently scales production to meet customer demand. By using Raise3D’s platform, Sooley has reduced overhead costs and minimized shipping times by exploring the possibility of local micro-factories. Their commitment to sustainability, comfort, and customization is powered by the Raise3D E2, which has streamlined their entire scan-to-print process.
Which 3D Printing Technologies Are Commonly Used?
In the field of 3D printing orthotics, several technologies offer distinct advantages depending on the requirements of the final product. Below, we will explore the four most common 3D printing methods used in orthotic production.
Fused Deposition Modeling (FDM) is one of the most budget-friendly options, ideal for those starting with 3D printing. FDM works by extruding melted thermoplastic filament through a heated nozzle, layer by layer. This method is often chosen for flexible filaments like TPU, though it requires careful handling to avoid print failures.
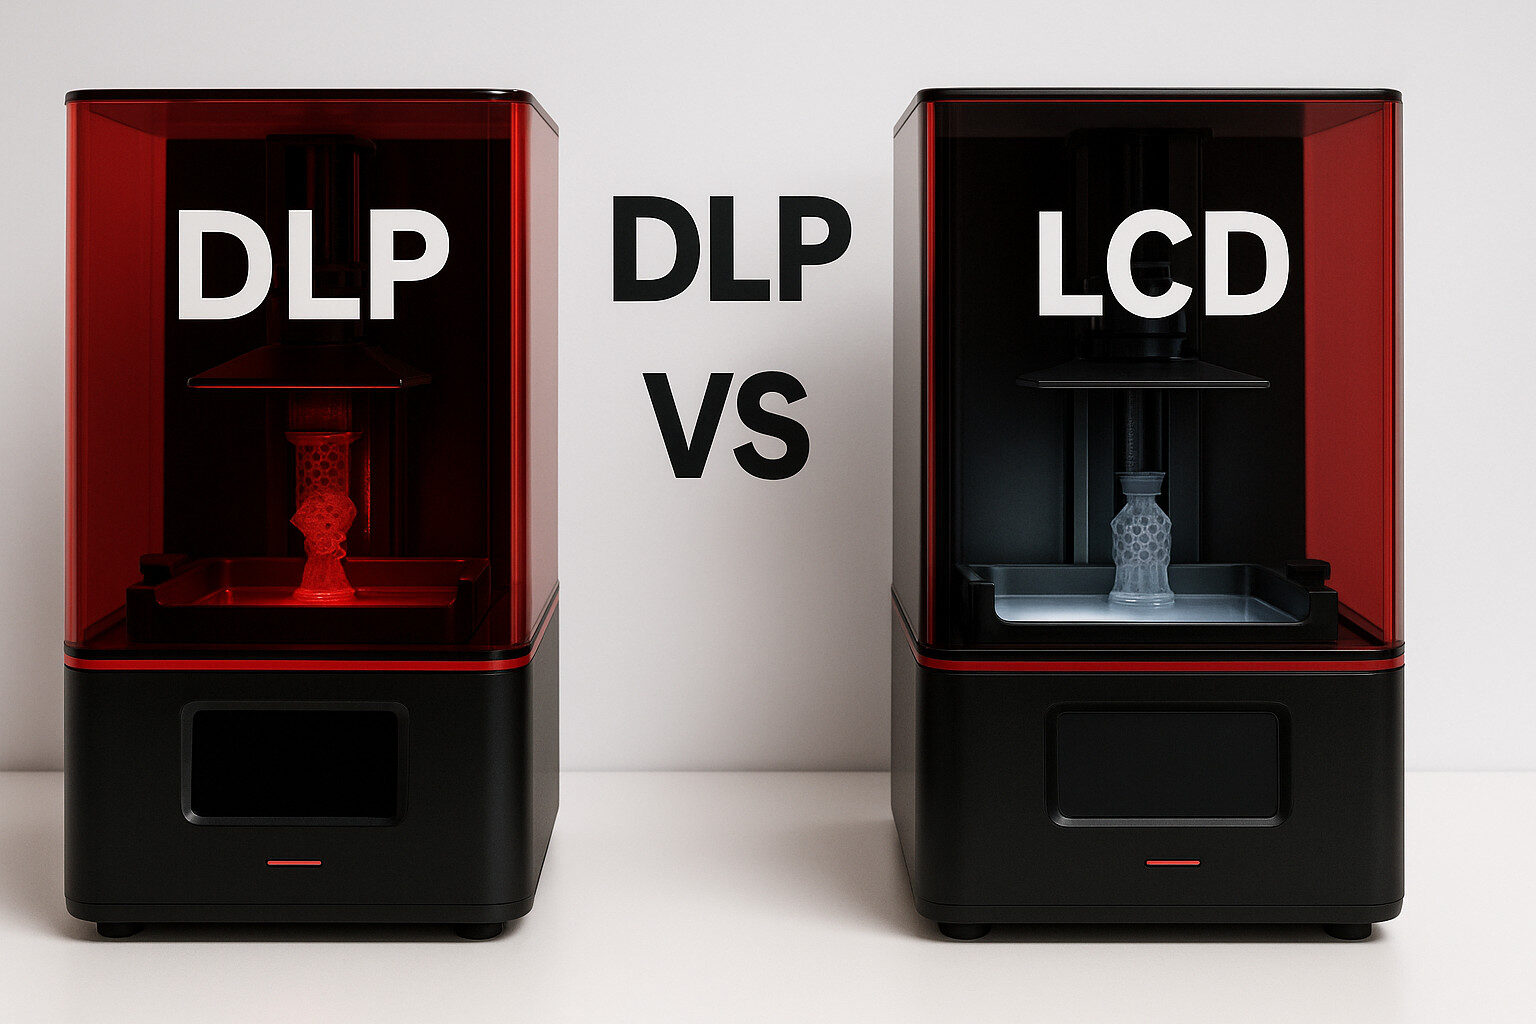
Stereolithography (SLA) uses a laser to cure liquid resin layer by layer. This process provides high detail and precision, making it perfect for rigid parts, but it can be slower compared to other methods.
Selective Laser Sintering (SLS) is well-suited for batch printing multiple orthotics. It uses a laser to fuse powdered materials together, resulting in strong, durable parts. This method is ideal for mass production, as it can print multiple units simultaneously.
Digital Light Processing (DLP) has advantages over SLA in terms of speed and reliability. DLP uses a projector to cure resin, offering faster print times. DLP also benefits from a higher rate of first print success due to its semi-automated workflow, making it more efficient than other resin technologies. Its RFID-powered workflow and integrated post-processing make it a robust choice for high-quality orthotic production.
Which 3D Printers are Best for Orthotics?
When choosing a 3D printer for orthotics production, certain criteria must be considered to ensure optimal results. Build volume is important for accommodating different sizes of orthotics, especially full-length models. Resolution ensures that the details, such as foot contours and structural supports, are accurately captured. Printers with direct drive extruders are especially important for reliable printing of flexible materials like TPU, which is commonly used for insoles.
A heated bed or enclosure is often required for printing with flexible filaments to prevent warping. Temperature control is crucial to maintaining consistent print quality. For efficiency in batch production, the printer should be capable of handling multiple orthotics at once, ensuring cost-effective production. Popular models for orthotics include the Raise3D E2, which offers excellent resolution, a heated bed, and flexibility with various materials.
Which Materials are Best for 3D Printing Orthotics?
When it comes to 3D printing orthotics, choosing the right material is crucial for achieving the ideal balance of flexibility, durability, and comfort. Various polymers are commonly used, each offering unique benefits.
TPU (Thermoplastic Polyurethane) is often preferred for flexible full-length orthotics, with a Shore hardness of around 95A. TPU provides excellent shock absorption, adaptability to foot movement, and customized arch support. This makes it a popular choice for patients needing comfort and pressure distribution.
Nylon is another common material, offering durability and flexibility. It is often used for parts of the orthotic that need to support heavy loads. It is lightweight and breathable, making it ideal for long-term wear.
Carbon Fiber-infused filaments offer a rigid structure, making them well-suited for producing thin orthotic shells that require stiffness but not brittleness. These materials are often used in cases where strength is needed without compromising flexibility in specific regions.
While materials like PLA may be suitable for prototyping, they are generally too brittle for orthotics that need to endure heavy loads over time. For full-foot or shell-style orthotics, stiffer materials can support the arch, while flexible top covers, such as leather or foam, add comfort.
RAISE3D Resins
RAISE3D offers two exceptional resins ideal for creating custom orthotics: Henkel LOCTITE 3D PRO476 Black and Henkel LOCTITE 3D PRO417 Black. These high-performance photoplastics are known for their durability, flexibility, and impressive surface finish, making them great choices for 3D printed orthotics, especially for insoles and related foot care solutions.
Henkel LOCTITE 3D PRO476 Black offers high-strength properties, making it ideal for performance prototypes and tooling applications. Its moderate heat resistance (HDT 60°C) and excellent surface finish make it a strong candidate for creating orthotic insoles that require both durability and comfort. It provides high impact resistance, allowing for the production of orthotics that can handle everyday wear and tear. With flexibility and toughness, the PRO476 resin supports customized orthotic applications, especially when precise mechanical properties are needed for different foot conditions.
Material properties include:
- Tensile Stress at Break (Post-Processed): 39 – 42 MPa
- Young’s Modulus: 1550 – 1730 MPa
- Elongation at Break: 55 – 60%
- Heat Deflection Temperature (HDT): 60 – 62°C
Henkel LOCTITE 3D PRO417 Black, another fantastic resin, features outstanding surface finish and superior strength and impact resistance. It is particularly effective in creating jigs, fixtures, housings, covers, and even orthotics. Its moderate heat resistance (HDT 49°C) and excellent mechanical properties make it suitable for insoles that need to withstand significant daily pressure while maintaining flexibility and comfort. This resin is highly effective when combined with DLP technology to provide accurate foot contour replication.
Material properties include:
- Tensile Stress at Break (Post-Processed): 38 – 40 MPa
- Young’s Modulus: 1212 – 1384 MPa
- Elongation at Break: 94 – 105%
- Heat Deflection Temperature (HDT): 48 – 49°C
Comparison with Competitors: While HP Multi Jet Fusion (MJF) is known for producing flexible and durable insoles, and Carbon DLS provides excellent biomechanical performance, the RAISE3D PRO476 and PRO417 resins stand out as more affordable alternatives that still deliver high precision for custom-fit orthotics. In comparison to Formlabs SLA/LCD, which is suitable for short-term wear but less durable than TPU-based solutions, the LOCTITE 3D PRO476 and PRO417 resins offer greater toughness and a smoother surface finish, making them more comfortable and less prone to skin irritation.
How Do Material Choices Impact Orthotic Performance?
Material selection plays a crucial role in determining the performance and comfort of 3D printed orthotics. Stiff materials provide the support necessary for proper alignment and structural integrity, particularly in full-length orthotics. However, to ensure comfort and shock absorption, flexibility is also vital. Materials like TPU, with a Shore hardness of around 95A, strike an ideal balance between rigidity for support and elasticity for shock absorption.
For people with sensitive feet, such as those with diabetes, skin compatibility is essential. Materials need to be hypoallergenic, breathable, and moisture-resistant to avoid irritation and ensure long-term comfort.
Which 3D Models Are Best for 3D Printed Orthotics?
To create high-quality 3D printed orthotics, file formats like STL and OBJ are commonly used. These formats are ideal for capturing the detailed geometry of foot contours and arch shapes. Precision in the 3D model is crucial to ensure the orthotic will fit comfortably and provide necessary support. High resolution is required to accurately replicate the foot’s unique features, especially for custom orthotic devices. Parametric customization is also important as it allows for efficient adjustments to the design for multiple patients, saving both time and resources when multiple iterations or refinements are needed.
What are Different Types of Orthotics?
Orthotics come in various designs, each tailored to address specific foot conditions and patient needs. The most common types include full-length, three-quarter, and shell orthotics. Full-length orthotics extend from heel to toe, providing complete foot support, while three-quarter orthotics cover the heel to the ball of the foot, leaving the toe area free for flexibility. Shell orthotics are typically more rigid and provide targeted support, often used in cases of severe foot misalignment. The choice of orthotic design depends on factors like the patient’s activity level, footwear type, and medical requirements, ensuring the best fit and functionality.
What Is a Full-Length Orthotic/Insole?
A full-length orthotic extends from heel to toe, offering comprehensive support for the entire foot. This type of orthotic is ideal for conditions that require overall foot stabilization, such as plantar fasciitis or over-pronation. Full-length insoles help in shock absorption and maintaining proper alignment, reducing stress on pressure points. This design is commonly used by individuals who need maximum support for their feet during daily activities or physical exertion.
What Is a Three-Quarter Orthotic/Insole?
A three-quarter orthotic covers from the heel through to the ball of the foot, leaving the toe area flexible. This design is especially beneficial when the toe box of footwear is limited or when partial forefoot freedom is needed. Three-quarter insoles are commonly used to address mid-foot support issues, offering comfort while maintaining enough space for the toes to move. It’s a great option for individuals seeking moderate support without compromising flexibility in the toe region.
What Is a Three-Quarter Shell Orthotic/Insole?
A three-quarter shell orthotic is designed with a thinner, more rigid base, offering targeted support without covering the entire foot. This partial foot coverage focuses on areas like the arch and mid-foot to address biomechanical needs. It’s especially useful when targeted stiffness and minimal overall weight are priorities, such as when the patient needs flexibility in the toe area. Three-quarter shell orthotics are often used by individuals who require mid-foot correction or extra support without sacrificing toe mobility, making them ideal for conditions that benefit from focused stabilization without limiting movement.
How Do Support Materials Affect 3D Printed Orthotics?
Support materials play a crucial role in 3D printing orthotics, particularly in processes like FDM or SLA when complex geometries are involved. These materials temporarily hold the print in place during fabrication, especially when printing intricate designs with flexible filaments like TPU. After printing, supports need to be removed or dissolved, which can impact the final quality and comfort of the orthotic. The process can add complexity and cost, but it ensures the orthotic has the right structural integrity and smoothness. Effective removal of support material improves the overall fit and comfort, crucial for patient care, especially for those with sensitive feet or specific medical conditions.
How Do Support Materials Affect 3D Printed Orthotics?
Support materials are essential in certain 3D printing processes, such as FDM or SLA, to maintain the integrity of complex orthotic designs. These materials help keep the print in position during the manufacturing process, particularly in flexible orthotics where intricate geometries are needed. After printing, the removal or dissolution of support materials can impact the final comfort and appearance of the orthotic, especially if the support material isn’t properly removed. The complexity of this process can add both cost and time, but proper finishing ensures smoothness and comfort, which is especially crucial for patients with sensitive feet.
What are the Common Challenges of 3D Printing Orthotics?
3D printing orthotics offers numerous advantages, but it also comes with its own set of challenges. The cost of hardware, particularly for high-end printers, can be a significant roadblock for smaller practices or clinics. Additionally, there is often a learning curve for staff who are new to 3D printing and may require specialized training. The choice of materials, such as filaments and powders, can also present challenges, as certain materials may require specific print settings or advanced ventilation to ensure optimal results. Furthermore, scaling production can be tricky—while a small print farm may handle moderate volumes, large-scale production often requires careful planning. Lastly, clinicians may need to adapt their workflows to integrate scanning and design software, which can require additional time and resources.
How Does Price Affect Adoption?
The adoption of 3D printed orthotics can be influenced by various cost factors, particularly material, hardware, and maintenance costs. For small practices, the initial investment in 3D printing equipment may be high, but it can be a cost-effective solution in the long run due to the efficiency and customization it offers. Fully custom 3D printed orthotics can cost around $300 or more, while mass-produced alternatives typically range from $60 to $80. Many providers accept the higher cost, knowing that 3D printing provides better patient outcomes, improved customization, and faster turnaround times.
Is Access to 3D Printed Orthotics Limited?
Access to 3D printed orthotics can be limited in remote or underserved areas, where the technology may not be readily available. However, with telehealth options becoming more widespread, scanning and design work can be done off-site, ensuring that patients in distant locations can still receive custom orthotics. Centralized labs equipped with 3D printing technology can receive digital foot scans from patients and ship the finished orthotics to various regions. This ensures that even patients in areas with limited access to 3D printing services can benefit from custom, high-quality orthotics tailored to their specific needs.
How Do You Ensure Quality Control for 3D Printed Orthotics?
Ensuring quality control for 3D printed orthotics involves several essential steps. First, mechanical testing is crucial to validate the strength and durability of the orthotics. Tests for tension, compression, and fatigue are commonly used to assess performance. Additionally, regular calibration of printers and proper maintenance of equipment are key to maintaining consistent print quality. This includes ensuring accurate print resolution and optimal material use. Feedback loops are also essential; by capturing real-time patient data, clinicians can refine designs in subsequent prints, improving the overall fit and function. New workflows involving scanning and design software need to be validated for accuracy and repeatability to meet or exceed manual fabrication standards.
How Long Do 3D Printed Orthotics Last?
3D printed orthotics can last as long as traditional orthotics, often a year or more depending on usage. The lifespan of these devices is influenced by several factors, such as print quality, material selection, and the patient’s weight and activity level. Properly designed and printed orthotics are built to withstand regular use and provide the necessary support. However, over time, wear and tear can affect their performance. For optimal longevity, periodic checks are recommended to ensure that the orthotics continue to provide the required support and comfort. Routine evaluations will help maintain their effectiveness and prevent any issues with fit or function, ensuring patients receive consistent care throughout the lifespan of the device.
How Do You Maintain, Clean, and Replace 3D Printed Orthotics?
To maintain 3D printed orthotics, regular care is essential. For day-to-day cleaning, gently wipe or wash them with mild soap and water to remove dirt and prevent buildup. It is also crucial to inspect the orthotics periodically for signs of wear, such as cracks, material degradation, or changes in shape. These signs may indicate that it’s time to replace them or consider reprinting. If structural integrity is compromised or the user’s foot condition changes, reprinting the orthotics may be necessary to ensure proper support. Refurbishing steps, such as adjustments or repairs, can extend their lifespan, but regular monitoring is key to maintaining optimal function.
How Much Does It Cost to 3D Print Orthotics?
The cost of 3D printing orthotics can vary significantly depending on several factors. The initial setup costs for 3D printers are typically higher than traditional molding methods, with equipment, software, and training expenses. However, over time, the customization and material efficiency of 3D printing can lead to long-term savings, especially for practices that produce orthotics on-demand. The cost of materials, such as filaments and powders, can also fluctuate, with prices ranging from $20 to $80 per unit, depending on the material quality and printer type. Fully customized 3D printed orthotics typically cost around $300 or more, whereas mass-produced orthotics are priced at $60–$80. Despite the higher upfront investment, many clinics justify the costs by noting improved patient outcomes, faster turnaround times, and more precise customization options.
What Does the Future Hold for 3D Printed Orthotics?
The future of 3D printed orthotics holds exciting advancements, particularly through AI-driven design, advanced scanning, and the use of innovative materials like carbon-fiber composites and biocompatible resins. Research in material science continues to push boundaries, focusing on creating orthoses that are lighter, stronger, and more comfortable. These developments will likely improve the precision of 3D printed orthotics, providing better support and enhancing patient care. Additionally, as printer capabilities improve and scanning solutions become more widely available, we can expect greater accessibility and efficiency in the production of orthotics. The integration of data analytics, such as gait, posture, and imaging analysis, with automated design systems will further streamline the process, enabling faster and more accurate orthotic manufacturing. As a result, the market for 3D printed orthotics will continue to grow, offering more personalized and efficient solutions for patients.
Conclusion
To wrap it up, 3D printing is changing the game when it comes to custom orthotics. Imagine having orthotics made just for your feet, designed to fit perfectly and help with your specific needs. Whether it’s full-length support or a customized insole to ease pressure, 3D printing lets us create exactly what’s right for you. It can capture real-time data, like your gait and foot movement, we can make sure each orthotic is as effective as possible.
Sure, the upfront costs might seem higher than traditional methods, but the benefits are huge! Faster results, better comfort, and custom solutions mean happier patients and better outcomes. Plus, with new materials and tech constantly improving, 3D printing will only get better and more accessible.
If you’re ready to step into the future of orthotics, 3D printing is the way to go. It’s personal, it’s innovative, and it’s making foot care easier and more comfortable for everyone.