How to Change a 3D Printer Nozzle on the E2

This manual will show you how to replace the nozzle of your E2 Raise3D device. Follow the easy steps below to have the most of your 3D printer and provide a long-life and durable device.


List of Tools Needed

  • 2mm hex wrench
  • 8mm socket wrench
  • Longnose pliers
  • Heat resistant gloves
  • 3 mm stainless steel feeler gauge

Tools

Gloves

Power On The 3D Printer

1. The first step is to turn on your device.

2. Click “Filament Loader” to unload any filament in the extruder. (If there is no filament inside, you can just skip this process)

E2 Desktop 3D Printer Load Screen


3. Then click the “Utilities” menu and next access the “Move Axes” option. Click on the upper arrow that appears on your screen and shift left the X-axis to a proper height for the following operation. Check the images below to have a reference on this process

E2 Utilities Screen

E2 Desktop 3D Printer

Disable the Motor

3. Click the “Motor Disable” button. Then move the extruder which needs to replace the nozzle to be placed in a central position.
-Note: This tutorial will take the left nozzle replacement as an example


E2 Utilities screen


E2 3D Printer

Loosen the Screws

4. Use your 2mm wrench to loosen the two screws located on the extruder cover. Then take the cover off carefully

Loosen 3D Printer Screws


5. Loosen the clamping screw with the 2mm hex wrench.
-Note: The hotend is extremely hot at this point, please remember to put on the heat resistant gloves

Loosen 3D Printer Clamping Screw


6. Pull out the entire hotend from the extruder.
-Note: Please be careful not to pull apart the cable

Pulling Out Extruder from 3D Printer

Set the Nozzle Temperature

7. Click the “Home” menu and then access the option “Nozzle Temp”. Then set the temperature to be 200℃, then put on the heat resistant gloves, and use the pliers to clean the extruder, and the 3D printer hotend carefully.

Set Nozzle Temperature on 3D Printer

Select Temperature


Managing the Hotend

8. Clamp the 3D printer hot end with the nipper pliers

9. Then loosen the nozzle with the 8mm socket wrench. Note: (Please remember to keep the gloves on during this whole process for your safety. The hotend is made from aluminum, please clamp it with a proper force. Otherwise, it might be out of shape. And do not twist the plier as the throat tube might bend)


Handling 3D Printer Hotend


10. Once you have taken off the old nozzle, set the 3D printer hotend temperature to 0℃. Then wait for this to drop to room temperature. Check the images below to have a guide on this process

Set Nozzle Temperature Screen

Select Temperature


11. Once the hotend has cooled down to room temperature, install the new nozzle back to the hotend

Reinstalling 3D Printer Hotend

Setting Back the Temperature

12. Next, you need to set the hotend temperature back to 200℃. Clamp the hotend with a nipper plier, then tighten the nozzle with an 8mm socket wrench.
Note: The hotend is extremely hot at this point, please remember to put on the heat resistant gloves, and do not overexert in case of gear slip

Setting 3D Printer Hotend back


13. Insert the hotend into the extruder, then tighten the clamping screw to hold the hotend in place

Insert 3D Printer Hotend


14. Install the extruder cover back, and use a 2mm wrench to tighten the two screws on it

Reinstall 3D Printer Extruder Cover

Calibrate the Nozzle

15. After the nozzle been replaced, run the five-step wizard to calibrate the nozzle’s Z probe Offset, it is recommended to adjust the height of the left and right nozzles as well. (For more information please refer to the tutorial: Manual E2 – How to Adjust the Height of Left and Right Nozzle – V1.0). Note: You can find the “Offset Calibrations” at “Settings>Machine>Maintenance>Offset Calibration”

Calibrating Nozzle Screen

Maintenance Tab on E2 3D Printer

Select Offset Calibration on E2 3D Printer

Start Offset Calibration

E2 Calibration Options


Connect with Raise3D:

Have you had a great experience with Raise3D that you would like to share? Please contact us at inquiry@raise3d.com. We look forward to hearing from you.

For more information about Raise3D printers and services, browse our website, or schedule a demo with one of our 3D printing experts.

How to Use ideaMaker with RaiseCloud

Using ideaMaker and RaiseCloud is a fast and efficient way of creating an optimized workflow for creating 3D prints.  This streamlined process makes printing easy, whether you’re sending jobs to one printer, or a thousand. Production-grade 3D printing is easy to implement when you combine the simplicity and power of the ideaMaker Slicer and RaiseCloud printing management.


What is ideaMaker?

The Raise3D ideaMaker software is our free slicing program that converts 3D files into printable designs. With ideaMaker, you can import your 3D models, and select the printing parameters that you want.  ideaMaker will then automatically ‘slice’ this file into layers and save as a GCODE file which will be used as the instructions to print your model.


What is RaiseCloud?

RaiseCloud is an online print management network.  With RaiseCloud,  you have total control in managing your 3D printers from wherever you are.  With the RaiseCloud interface, you can monitor your print jobs with up-to-date stats and live printer feeds, as well as have powerful scheduling and workflow features to manage a team of people and multiple printers – and more.
This makes large scale production jobs even easier than before, and best of all – it’s completely free.


Optimizing your 3D Printing Workflow with RaiseCloud

In this guide, we will guide you through the steps to get your ideaMaker files into the RaiseCloud interface.  This is assuming you have some experience using the ideaMaker program.  If you would like to learn more about using ideaMaker, we recommend visiting the “Getting Started with ideaMaker” Blog, or our ideaMaker Basics video.


Before you get started:

In this guide, we will be highlighting the latest features in ideaMaker that make it directly compatible with RaiseCloud.  Before you get started with this guide, make sure that you are on the latest version of ideaMaker (3.6.0 or later), and that you have created a RaiseCloud Account and connected it with your printers.

ideaMaker Download 

RaiseCloud Homepage


Step by Step Instructions for Pairing ideaMaker with RaiseCloud

1. To prepare a file, start by opening the ideaMaker, and import your model.  You can import a .stl, .obj, or .3mf file by using the ‘import model’ button, or by dragging and dropping the file into the workspace.  Once loaded, make any necessary adjustments to your model based on your printing preferences.


2. When you’re ready to print, click the “Prepare Slice” button on the left side of the software interface. In this menu, select the slicing parameters that you would like to use for this print.


3. Click “Slice” to begin slicing your file.


4. After slicing is completed, you can preview your slice result.  If your file appears correct, you can now upload it to RaiseCloud.  In the menu, click the drop-down arrow next to “Upload” and select “Upload to RaiseCloud”.


5. You will be prompted to log in to your RaiseCloud account with your existing username and password. After you successfully log in, you will begin to see the progress of the file upload in the upload queue ideaMaker interface.


6. When the file is completed, click the RaiseCloud icon on the side of the file upload to enter RaiseCloud’s printing menu.
Here you can send this uploaded file directly to one or more of your printers. For example, you can select an individual printer, a group of specific printers, or you can send your file to all your available printers for the most efficient mass-production workflow.


Step 7 Once you’ve selected the printers you want to use, click the “Start Print Now” button. The selected printers will automatically start the printing process. 


RaiseCloud is a wide range of powerful features that help optimize the 3D printing process and customize it to your business. Execute print jobs, monitor progress during printing, schedule tasks with team members, and more.


Connect with Raise3D:

Have you had a great experience with Raise3D that you would like to share? Please contact us at inquiry@raise3d.com. We look forward to hearing from you.

For more information about Raise3D printers and services, browse our website, or schedule a demo with one of our 3D printing experts.

How to Change a 3D Printer Air Filter on the Pro 2 Series

3D printer air filters are meant to capture any possible fumes released during the printing process. Changing the air filter of a 3D printer is important maintenance that protects a person’s health as well as helping the printer operate smoothly. Luckily changing the air filter of both the Raise3D Pro 2 and Pro2 Plus is simple.


Required Tools
-Phillips Screwdriver


1. Remove the screws that are marked with red boxes in the following two images. The left image shows the screws marked for removal on the Pro 2. The right image shoes the screws marked for removal on the Pro 2 Plus.

Pro2 and Pro2 Plus 3D-Printers


2. Hold the filter system with one hand and remove the four Phillips head screws from the back cover with the other hand.
The image below marks the location of which screws to remove from the Pro 2 and Pro 2 Plus in red.

3D Printer


3. Separate the filter system into a total of four parts. This will include the fan, filter cartridge, and two brackets.

Removing the 3D Printer Air Filter


4. Take the original filter cartridge out and install a new filter cartridge.
Face the black honeycomb side of the cartridge to the no label side of the fan. Use the two bracket frames to secure the filter cartridge and the fan.

Putting a New 3D Printer Air Filter into a Frame


5. Hold the filter system with one hand and install the four Phillips head screws with the other hand.
Face the tiny arrow on the label of the fan upwards. Be careful with the fan cable.

Replacing a 3D Printer Air Filter


6. Install the Phillips head screws of the back cover.


Connect with Raise3D:

Have you had a great experience with Raise3D that you would like to share? Please contact us at inquiry@raise3d.com. We look forward to hearing from you.

For more information about Raise3D printers and services, browse our website, or schedule a demo with one of our 3D printing experts.

How to Use 3D Printing for Prototyping

Prototyping is always a mandatory process for product development. It plays a role to ensure the design outcome performing right in every aspect and feasible for mass-production. After deciding to launch a product, the company will invest more than millions of dollars in setting up production, ordering raw materials from suppliers, and coordinating marketing campaigns. Not to mention those years and funds already invested in prior R&D. Therefore, prototyping is critical by saving the company the wrong decision.


What is the Role of Prototyping?

Role of Prototyping

Source- Just UXDesign


Furthermore, the speed of prototyping will alter the success rate of marketing capturing. One decade ago, the lead time of the mainstream prototyping process took months or more. In these years, prototyping practice has evolved into rapid prototyping by emerging 3D printing. 3D printing is widely regarded as a perfect match for prototyping. FFF is one type of 3D printing with unique advantages in prototyping. It melts and extrudes thermoplastic thread continuously to trace the cross-section of a part for each layer. This blog will focus on FFF type 3D printing for prototyping.

Exploring FFF 3D Printing: Click to View More.
Raise3D Prototyping

Traditional Prototyping Process

Traditional prototyping is a process with a workshop style. By prototyping, engineers are creating an object from ground zero, therefore they have to rely on basic resources like tools, limited machines, adhesives, materials, and human labor. Even with all resources prepared, there are no particular steps to follow. Engineers need to create parts piece by piece and assemble them.

Among all available resources, CNC provides the highest efficiency and taken as major productivity in prototyping. However, it cannot cut out cavity structure such as a bottle or enclosed box. Without specialized equipment, many kinds of geometries are not achievable by an easy process. Under such conditions, traditional prototyping consumes a large amount of time in crafting structure by hand, making numerous single parts, and assembling them.


Traditional Prototyping Environment

Traditional Prototyping Environment


Sources: https://twitter.com/GravityLight/status/1070710236061843456/photo/1

Rapid Prototyping by 3D Printing

Due to additive mechanisms, 3D printing can eliminate a large amount of time-consuming work using traditional fabrication methods. Like CNC, 3D printing is also one type of digital fabrication. This refers to that machine operates by following digital command from the software. In specific, design can create a digital model with intricate geometry never achievable by CNC, such a hollow sphere. The digital design file is then imported into 3D printing software and converted into Gcode which can be read by the printer and control its printing. The major change is its ability to form multiple pieces with any geometry in one printing round. Such an advantage enables 3D printing to create complicated parts in hours that traditionally consume days of manual work. Many enterprise users have proved an extraordinary reduction in prototyping lead time by 3D printing.

Hollow Structure by FFF 3D Printing. Click to View More.

How to Apply 3D Printing for Prototyping Effectively

When considering how to apply FFF 3D printing, users need to identify the prototype’s visual and functional requirements. Prototyping is a progressive process with phases rather than a one-stop process. In common industry practices, there are three levels of prototyping which are proof of concept, appearance, and engineering. Each level has its purpose and requirement and is closer to final mass-production than the previous one. Meanwhile, FFF 3D printing allows user to tradeoff between printing speed and surface quality. Users can change both hardware and software settings to achieve the desired balance according to current prototyping requirements.


Proof of Concept Prototyping

Proof of concept prototype is required at the beginning phase of product development where the designer must verify his design’s feasibility. This stage concerns utility over appearance. A designer only needs a structure that can hold all components together. Meanwhile, the mechanical property is less required because safety and durability are not essential. Before adopting 3D printing, manual work with cheap material was a major approach, such as cutting, gluing, and screwing. The result was usually a simple and ugly structure with components installed. When using FFF 3D printing, the user only needs to focus on designing a more optimized digital scratch and leave production work to the printer. The result will be not only a much more delicate part but also less time spent. The user should choose the fastest setting. Its surface performance may be a little rough due to stair-stepping effects, but it is not against the purpose of the prototype. Also, FFF 3D printing uses low-cost plastic material and machines. Thus FFF 3D printing provides a great match to this prototyping stage.

UAV Concept Prototype: FFF 3D Printed vs. DIY Method

Appearance Prototyping

The appearance prototype, as the opposite, puts total weight in visual aspects and ignores actual functionality. In this stage, prototype aims for maximum resemble appearance to the final products. In other words, it demands requires extremely high printing resolution and low layer height from 3D printing equipment. Usually, with the most precise setting, a professional FFF 3D printer can provide XY resolution as high as 0.2 mm and layer height as low as 0.05 mm, which are enough to meet most visual demands. It needs to be noted that, FFF printer is friendly to thick features, while tiny features performance may be limited. Also, FFF 3D printing needs aid from PVA filament to provide a smooth downward surface, whereas an upward surface doesn’t need it. Users can use more FFF printing to maximize performance, such as printing orientation and design optimization. FFF 3D printer is a great tool for an experienced user in this prototyping stage to deliver satisfying performance.

Maritime Application of Appearance Prototyping with Raise3D Printers Click to View More.

Engineering Prototyping

When entering the engineering prototyping phase, engineers face more restricted standards. Besides visual resemblance, engineers have to consider functional resemblance as well. This means spare parts properties must be close to the functional expectation of the mass-production product. The material used for spare parts should provide certain functional properties that are enough for field trials, but is not fully qualified as those used in final products. Furthermore, the prototype contains different spare parts with different functional purposes. Their functional performance relies on the property of the material used.  FFF 3D printing has an advantage in this aspect due to its wide material compatibility. The current material selection pool for FFF 3D printing includes a wide range of engineering and commodity plastics that provide enough functional performance for short term usage. Users should choose the FFF 3D printer with a higher heating temperature which is compatible with more materials. This allows for higher possible performance and richer property from spare parts.

An Acoustics Engineering Prototypes with Raise3D Printer Click to View More.

3D Printing is Effective

All in all, the user needs to identify the demand for certain prototyping phases and apply FFF 3D printing effectively. As the core feature of FFF 3D printing, automatic production, and freedom to form any geometry helps companies to shorten the lead time, not to mention its low-cost material and machine. To further increase the effectiveness of 3D printing, users can take advantage of its adaptive performance and wide compatibility of material.


Connect with Raise3D:

Have you had a great experience with Raise3D that you would like to share? Please contact us at inquiry@raise3d.com. We look forward to hearing from you.

For more information about Raise3D printers and services, browse our website, or schedule a demo with one of our 3D printing experts.


How to Use 3D Printing for Production

3D printing (also known as additive manufacturing) is being increasingly applied in many different industries. Usually, 3D printers are conceived as a prototyping tool for designers and makers. However, with the development of technology, 3D printing shows more potential in the entire production process.

Footwear manufacturers (Like Adidas, Nike) are one of the first companies that adopt 3D printing in the production process. They are using additive manufacturing (AM) for prototyping, in particular. In some cases, 3D printing helps create molds for traditional production. In other cases, footwear parts are created using only 3D printers.


In this example, we will use the footwear industry to show how 3D printing is applied for production. The main trends driving 3D tech adoption in footwear are:

  1. Footwear Customization
  2. Rapid Prototyping
  3. Manufacturing Footwear


Footwear Customization


Ecco Innovation Lab showcasing an in-store setup for its custom insole service

Ecco Innovation Lab showcasing an in-store setup for its custom insole service


A range of companies offers custom footwear services. Mobile apps are often included as a perk, allowing customers to easily access and share 3D models and additional data about their required footwear. Ecco offers such a comprehensive footwear customization service. The fitting session requires about 10 minutes of the costumer’s time and can be performed on-site. It follows three basic steps:

  1. 30 sec. real-time scan
  2. Data-driven analysis and 3D modeling
  3. In-store 3D printing of custom insoles


These custom shoes cost between $390-445. Keep in mind, as the application of 3D technology expands within the footwear industry, such 3D custom services are likely to differentiate themselves among affordable and higher-end markets.


Traditional Materials vs AM Filaments

There are specific properties necessary for quality insoles, like good viscoelasticity, durability, and temperature stability. Polyurethane (PU) has long been used to provide quality and affordable insoles. But non-thermoplastic PU and rubber are not compatible filaments for AM. That’s why AM is developing viable alternatives like Liquid Silicone Rubber (LSR) that can be printed with FFF (Fused Filament Fabrication) 3D printers. One of the benefits of FFF printers is their ability to create microstructures to fine-tune the properties of products. Oftentimes, it’s the cell size and internal design that makes the product more comfortable, lighter, and flexible.


Dual Nozzle 3D Printing

3D Printing Graph


Raise3D’s FFF printers can produce layer heights as low as <0.005 mm or 5 microns and are compatible with an ever-growing number of filaments like PLA, ABS, PET, Nylon, TPU, and PC.


Rapid Prototyping

Footwear production lines depend on several tasks that aren’t easily automated. That’s why it might take a while before AM footwear factories can become a reality. However, prototyping with 3D printers has already established itself within the footwear industry, also aiding in the creation of molds for traditional methods.

A PU midsole is peeled from a steel mold

A PU midsole is peeled from a steel mold


Three years ago, A Chinese footwear manufacturer started prototyping with a Vat Polymerization 3D printer. Before using 3D printing, it took the design team about 15 days to complete a prototype. 3D printing cut this down to 3-4 days. A midsole can now be completed within 8-10 hours and will cost them around $100 to print. Furthermore, since they’re completed on-site the entire design process has become more transparent and intuitive. It also reduces investment risks, since they now have the chance to test different iterations of a design before proceeding into product development.


3D printed prototype created on-site by the Raise3D’ design team for manufacturers with rubberlike TPU filament.

3D printed prototype created on-site by the Raise3D’ design team for manufacturers with rubberlike TPU filament.

The direct benefits of switching to 3D printing were:

  • 80% less time consuming
  • 70% cost reduction
  • In-house access to prototypes (rapid-prototyping capabilities)


Manufacturing Footwear


3D printed midsole for Adidas’ Futurecraft 4D

The 3D printed midsole for Adidas’ Futurecraft 4D


In the highly competitive footwear market, 3D printing can: adequately cater to individual needs, shorten revision cycle times, and provide on-demand production. Furthermore, there are no leftover materials in 3D printing, reinforcing the sustainability of the technology. For example, Adidas is pressing the envelope of sustainable production with its Ocean Plastics line by having midsoles printed out of recycled fishing nets.


3D printed midsole produced by Adidas using recycled PET filament

3D printed midsole produced by Adidas using recycled PET filament


Traditional Materials vs AM Filaments

Adidas opted for a type of Vat Polymerization technology for their midsoles, which relies on a tunable photochemical process. In this process, a vat of resin is cured using UV light to create each part. Adidas produced over 11 million pairs of shoes that contain ocean plastics in 2019 and has vowed to use recycled materials for all their PET products by 2024.


Uppers

Major shoe companies, like Nike and Reebok, have started implementing 3D printing technologies for footwear uppers. FFF technology is used to produce an array of TPU upper materials. The printers melt the filament, and then extrude it through a nozzle (e.g. Raise3D printers have dual extruders for simultaneous mirrored printing). By having shoe uppers 3D printed and automatically sewn to each shoe, companies drastically trim time, materials, and expenses. The benefits of using FFF are:

  • Rapid-fire prototyping
  • Optimized performance
  • Footwear innovation (no glue, lightweight, intricate designs)


Furthermore, 3D printing offers the right flexibility for rapid-fire prototyping. This means many iterations can be reviewed and optimized in a shorter timeframe. This provides for more intricate, higher quality materials, like Nike’s first high-performance 3D uppers (see below), made with TPU filament. This resulted in featherlight, intricately lined prints. TPU can easily be combined with other materials, and can also be heated up to bond with yarns, so the glue can be avoided in parts of the shoemaking process.


The whole shoe printing make by Raise3D with TPU filament and E2 printers

The whole shoe printing make by Raise3D with TPU filament and E2 printers

AM is Shaping the Future of Footwear

3D prototyping, customization, and production have established themselves within the footwear industry. AM is expected to expand further as advancements are made within 3D automation.


Analysis


  • In the upcoming decade, 3D printed footwear is projected to become the largest 3D printed consumer product, alongside household goods. 3D printing technology has experienced technological advancements and is now seen as a cost-effective manufacturing solution for mass production.


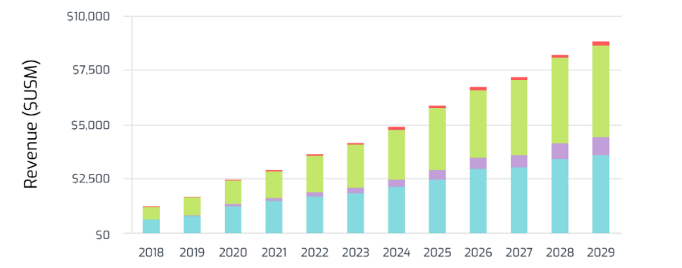
  • The adoption of 3D technology within footwear is expected to grow year-over-year, accounting for over 8 billion dollars in revenue in 2029. The two main technologies profiting from this growth are FFF (in Blue) and Vat Polymerization (in Green).


  • The macro trend of customization will continue to affect the footwear industry and will be accompanied by advances in 3D scanning and bio-mechanical sensor technology, as well as in intelligent learning and structural modeling.


  • 3D production of shoe parts like midsoles and uppers will continue to grow. Currently, it accounts for about 35% of revenue. This is forecasted to expand to over 50% by 2029.


  • Traditional prototyping will eventually be replaced by 3D prototyping within footwear design teams.


All in all, 3D printing is now making a huge impact on the footwear industry. It also shows great potential for many other industries. As more and more customers would like to choose customized products, 3D printing would bring more opportunities for all the traditional manufacturers.


Connect with Raise3D:

Have you had a great experience with Raise3D that you would like to share? Please contact us at inquiry@raise3d.com. We look forward to hearing from you.

For more information about Raise3D printers and services, browse our website, or schedule a demo with one of our 3D printing experts.

How to Update 3D Printer Firmware on the E2

This manual will show you how to update the motion controller firmware of your E2 Raise3D device. Follow the easy steps below to have the most of your 3D printer and provide a long-life and durable device.


List of Tools Needed


1. To start, you will need to download the latest version of the “Motion Controller Firmware”. To do this, access Raise3D’s Official website/Support Center/Download Center.


2. Save the “Motion Controller Firmware” file in the root directory of the USB drive. Note: Please do not change the name of the downloaded firmware file; otherwise the process of updating this will fail).


3. Insert the USB drive into the USB interface at the top side of the 3D printer. Note: The USB drive comes attached with the E2 3D printer). To access directly to download the latest firmware file, please access https://www.raise3d.cn/download/


4. Click the “Setting” icon in the upper right corner of the “Home” page.

Raise3D Home Page


5. Next, click the “Print” icon in the bottom right corner of the “Home” page of your touch screen to start the process. Check the images below for a reference on these steps.

Click on Print icon


6. Click the “USB Storage” icon on your screen

Click on USB Storage


7. Click the currently inserted “USB” device icon that appears on your screen

Click the USB Icon on the Print Screen for the E2


8. Next, proceed to click the downloaded new version of the “Motion Controller Firmware” in the root directory folder

Download the Motion Controlled Firmware


9. Click the “Restart” button in the “Machine” interface still under “Settings” and click on “Restart”

Click the Restart Icon


10. After restarting the device, the 3D printer will automatically recognize the “Firmware” update package located in the USB drive. Then click on “Install”

Rasie3D Firmware Update


11. Next, click the “Firmware Installation Package” you want to install from the “Raisepack” list. Note: If you downloaded the wrong model firmware, this option in the list will appear in gray and cannot be clicked

Firmware Installation Package


12. Go ahead and click “Yes” when the pop-up dialog box appears. And confirm that you wish to install the version selected

Click Yes


13. At this point, the 3D printer will start the Firmware installation process automatically

Starting Firmware Update Process


14. After the Firmware update is completed, a message in your screen will appear with “Please restart the printer to update the firmware”. This means that the Motion Controller Firmware has been updated successfully as it appears on the image below

Restart 3D Printer to Update Firmware


15. Next, manually you will need to turn off the printer power, and then turn on again the device after counting 30 seconds.
-Note: The 3D printer’s “Power” switch is located next to the power cable on the backside of the 3D printer as it appears on the image below)

Turn Off E2 Desktop 3D Printer


16. Once your device is turned on again, the screen will automatically display the “Home” page

Home Page


17. Then, click the “Setting” icon in the upper right corner of the “Home” page

Click on Settings on Top Right Hand Corner


18. Then finally, make sure to confirm the version number of the updated “Motion Controller Firmware”. under the “Machine” tab

Check Updated Motion Controller Firmware Number


Connect with Raise3D:

Have you had a great experience with Raise3D that you would like to share? Please contact us at inquiry@raise3d.com. We look forward to hearing from you.

For more information about Raise3D printers and services, browse our website, or schedule a demo with one of our 3D printing experts.

How to Unbox the E2 3D Printer

The E2 3D printer is an easy-to-use, durable desktop 3D printer to scale production and add a powerful new manufacturing resource for all your printing needs. Check this manual that will help you to unbox your machine and get ready to use your new 3D printer with easy steps. Don’t forget to contact us through our website in case you have any further questions or need specific help from one of our tech specialists.


1. When receiving your Raise3D E2 Printer, remove the protective package carefully until you can have a clear view of the box and packing straps.

Raise3D E2 Box


2. It is recommended to use protective gloves and a safe knife cutter to start safely removing the packing straps.

Gloves Unboxing the E2

3. Use your knife cutter to cut the protective packing tape from the top side of the box. Try to cut softly to avoid any further damage to the printer inside the package.

Cutting Open Box


4. Grab your hex head wrench that comes with your E2 and have this ready and handy as you will need this during the process of setting up your printer. Next, carefully remove the cardboard around the lid foam. Inside you will see that your 3D printer comes with five different international power cords. Select the proper cable for your service and remove all parts of protective foam.


E2 3D Printer Content in Box


5. Remove all cardboard pieces, the protective plastic, and all the rest of the packaging materials.

Remove Packaging


6. For the next step, it is recommended to have a second person that can help you to safely remove the top of the box. As this is a lid that protects the equipment, by doing this you provide a stable environment for the 3D printer.

Lift Box

7. Look for a clear and safe area where you will place the 3D printer. Then both persons need to lift the 3D printer using the left side handles to safely remove this from the package and release this from the foam protective padding.


Grab 3D Printer


8. Next, carefully place your 3D printer in the clear designated area to continue the setup.

E2 3D Printer


9. When the 3D printer is safe to start operating, open the lid of the printer to carefully remove the X-Axis locks. For this step, make to store the removed locks in a secure place, so in case you need to use them again they can be installed and used in subsequent transportation.

E2 3D Printer X Axis


10. Next, once the X-Axis locks have been removed, you will need to unscrew the two thumbscrews of the Z-Axis locks.


3D Printer Z Locks


11. Ready to start using your Raise3D E2? You are almost there. Now, you need to connect the power cord to the power socket. Then, turn on the switch and start the device, now the printer will enter the boot process. Your Raise3D E2 printer will take about 60 seconds to boot. Wait for the touch screen display to appear with a “Home” window screen. This is the indication that the printer is ready to work.


E2 3D Printer Home Screen


12. Once the main screen appears, access the “Utilities” menu option. Then, select the Z-Axis up arrow until the accessory kit appears to be removed.


E2 3D Printer Utilities Screen


13. Next, open the front door of the device and safely lift the accessory package and carefully remove this from the base of the 3D printer.


Accessory Package


14. Later, you need to open the side door located on one of the sides of the device and set the two filament holders to be placed on the installation points. Grab a spool of Raise3D PLA printing filament and then insert the filament to be installed on the filament holder.


Putting Filaments in a 3D Printer


15. Following, in the direction shown in the picture below, grab one of the ends of the filament and pass this through the guide pipe starting from the bottom and moving to the top. The guided pipe can be pulled put at the same time while pressing the metal quick connector.


Installing 3D Printer Filament


16. Next, to set the temperature of the nozzle, click the “Utilities” menu from the screen and choose the temperature that better match the requirements of the filaments that you are using. Then, click the “Load” button” and the device will start to warm up.


3D Printer Nozzle Settings on Utilities Screen


17. Once the target temperature is reached, click the “Load” button once again and complete the loading operation according to the instructions that appear on the screen.


Left Extruder Temperature


18. Finally, once the extruder gear starts rotating, place the filament to feed this into the left extruder. When the filament comes out from the left nozzle, press the “OK” button to finalize the operation.

Finalizing Left Extruder Screen


Connect with Raise3D:

Have you had a great experience with Raise3D that you would like to share? Please contact us at inquiry@raise3d.com. We look forward to hearing from you.

For more information about Raise3D printers and services, browse our website, or schedule a demo with one of our 3D printing experts.


How to Set Up Raise3D PVA to Print

Part of using a 3D printer from Raise3D is knowing how to properly set up and prepare filaments for printing. One example PVA is a water-soluble 3D printing filament. Learn how to print with PVA on a Raise3D printer while also following the generic steps of printing with a filament.


Required Tools:
-PolyBox (Dry box)
-Desiccants
-Guide Tube


Polybox


Preparation

1. Adjust nozzle heights and X/Y offsets to make sure the printer is properly printing dual color extrusion before attempting to use Raise3D PVA.

Note: For more information, please read our tutorial on the website “Manual Pro2 Series – How to Calibrate the Nozzle Offset -V1.0, Manual Pro2 Series – How to Calibrate the Nozzle Height – V1.0”.


2. Put the PVA filament in the Polybox and thread one end out of the box through the guide tube.


3. Remove the lid from your Raise3D printer.

Note: Room temperature should be about 18℃ or 65℉ degrees, if the room temperature is colder please use the lid on your Raise3D Printer.
PVA material is sensitive to moisture, and the Polybox is used for moisture control. Raise3D PVA does not need to be dried when first removed from the vacuum-sealed bag. However, if the PVA spool is left out after printing, it will need to be dried with a Print-dry system. Load a spool of Raise3D PVA into the Polybox and wait until the humidity is under 15%.


Raise3D PVA into the Polybox and wait until the humidity is under 15%.


4. Insert each guide tube into the Filament Run-out Sensor and load the PVA and PLA filaments into both hotend. Load the Raise3D PVA filament into the right hotend and load another filament into the left hotend.

Note: In the event of a failed print job, check if the Raise3D PVA filament is fully dried, or you may change the desiccant in the Polybox and dry the Raise3D PVA filament again.


Load the PVA and PLA filaments into both hotend


5. The tube must be smooth and without knots or bends. The Polybox should be placed higher than the printer. Do not load PVA into the left hotend.


Polybox and hotend

Setting ideaMaker to use Raise3D PVA

Note: Make sure to use the latest version of the ideaMaker.

6. Open ideaMaker


Open ideaMaker


7. Click “File” located at the top left side. Select “Import Models” from the drop-down menu.


Select “Import Models” from the drop-down menu


8. Click the “Start Slicing” button at the top center


Click the “Start Slicing” button at the top center


9. Make sure to select “[Raise3D] PVA 1.75mm” filament for the right extruder to prevent printing issues with the Raise3D PVA from happening


select “[Raise3D] PVA 1.75mm” filament for the right extruder


10. Select a Template.

Note: We use “High Quality – Pro2 – PLA” as an example below

Select a Template


11. Click the “gear” button on the right side of “[Raise3D] PVA 1.75mm” to check the Raise3D PVA Filament Settings.


Click the “gear” button on the right side of “[Raise3D] PVA 1.75mm


It checks the Raise3D PVA Filament Settings

12. The option of “Override Slicing Settings in Templates Linked to the Filament” is a default setting for Raise3D PVA.


Override Slicing Settings in Templates Linked to the Filament is a default setting for Raise3D PVA


13. Close the “Filament Settings” and click the “Edit” button followed by the “Advanced” button.

Note: Advanced menu may pop up right after clicking “Edit” if you have already entered in advanced mode.


Close-the-Filament-Settings-and-click-the-Edit-button-followed-by-the-Advanced-button


Advanced menu may pop up right after clicking “Edit”


14. Under the “Advanced” setting, select the “Support” tab and click the “General Support”. A drop-down menu will appear. Choose the option “All”.


Under the "Advanced" setting, select the “Support” tab and click the “General Support”


15. Locate the “Support Extruder” option on the left column under the “Support” tab. Select “Right extruder” from the drop-down menu. Then locate the “Dense Support Extruder” on the right column, and select “Right Extruder” from the drop-down menu.


Locate-the-Support-Extruder-option-on-the-left-column-under-the-Support-tab


16. Click the “Temperature” tab and tick the “Cool Down Inactive Extruder”

Click the “Temperature” tab and tick the “Cool Down Inactive Extruder”


17. Click “Save” to save these changes

Click “Save” to save these changes


18. Click “Slice” to start slicing the model

Click “Slice” to start slicing the model

Print

19. Apply PVA glue stick to the print build surface.


20. Check the adhesion of first layer printing to verify that the edges have not warped.

Preview:


Check the adhesion of first layer printing to verify that the edges have not warped


Check the adhesion of first layer printing to verify that the edges have not warped second preview


21. While printing it is a good idea to make sure the PLA and PVA are at the same height to ensure supported surfaces come out as cleanly as possible.

Note: If the material heights are not equal or you notice poor surface finish on supported surfaces, your nozzle offsets may need to be recalibrated.


Make sure the PLA and PVA are at the same height


Nozzle offsets may need to be recalibrated if height is not equal


22. Finished product


Finished product


For more information about 3D printers and 3D printing, visit and subscribe to the official Raise3D Youtube channel

Connect with Raise3D:

Have you had a great experience with Raise3D that you would like to share? Please contact us at inquiry@raise3d.com. We look forward to hearing from you.

For more information about Raise3D printers and services, browse our website, or schedule a demo with one of our 3D printing experts.

How to Replace a 3D Printer Nozzle on the Pro2 Series

Changing the nozzle on the Pro2 and Pro2 Plus 3D printers is a simple five-step process. However, before attempting to change the 3D printer nozzles, review the instructions for removing or re-installing the assembled hot end to the extruder head at the Manual Pro2 Series -032 How to Replace the Hotend-V1.0.


Required Tools
-8mm socket wrench
-Allen wrench


1. Check if the hot end is covered with a silicone sleeve. If it is, then remove the silicone sleeve from the hot end.

3D Printer Hot End with Silicone Sleeve


Then use an 8mm socket wrench to remove the old nozzle from the heating block.

Removing 3D Printer Nozzle with a Socket Wrench


To prevent any damage to the components of the hot end, DO NOT exert force on the throat tube. Hold the solid section of the heating block during adjustments.

Note: Cooled filament tends to solidify, and can glue the nozzle and hot end together. If the hot end has any remaining filament, preheat the hot end to melt the filament. Once the filament is melted use a spatula and tweezer to remove the filament attached in the nozzle or heating block.


2. Insert a cleaning rod completely through the hot end and ensure the tube is completely clear of blockages.

3D Printer Hot End with a Cleaning Rod


Screw the new nozzle into the heating block but do not tighten it completely. Ensure that there is a visible gap between the nozzle and the heating block.

3D Printer Nozzle Attached to Heating Block


3. Hold onto the heating block and tighten the throat tube by rotating the heat sink. Rotate it until the nozzle ‘catches’ on the tube (meaning it will begin to spin).

The heat sink may be askew when the right position is achieved. This is normal and will be adjusted in the later steps.
*If the heat sink is loose on the throat tube, secure the fixing screw before tightening the throat tube.

3D Printer Heat Sink


4. Hold on the heating block with an Allen key, and tighten the nozzle completely using an 8mm socket wrench. Check that a gap between the nozzle and the heating block is maintained.

3D Printer Nozzle and Heating Block


5. Re-attach the silicone sleeve, then loosen the fixing screw on the heatsink. Lie the hot end assembly on a flat surface, rotating the heat sink so that the fixing screw is facing outwards.

Silicone Sleeve


Move the heat sink down so that it rests on the silicone sleeve and tighten it into place.

Heat Sink


If you do not have a silicone sock, adjust the heat sink so that it is flush with the bottom of the large cylinder.

Heat Sink with No Sleeve

To reinstall the hot end assembly into the extruder head, please refer to the instructions in Manual Pro2 Series -032 How to Replace the Hotend-V1.0.


Connect with Raise3D:

Have you had a great experience with Raise3D that you would like to share? Please contact us at inquiry@raise3d.com. We look forward to hearing from you.

For more information about Raise3D printers and services, browse our website, or schedule a demo with one of our 3D printing experts.